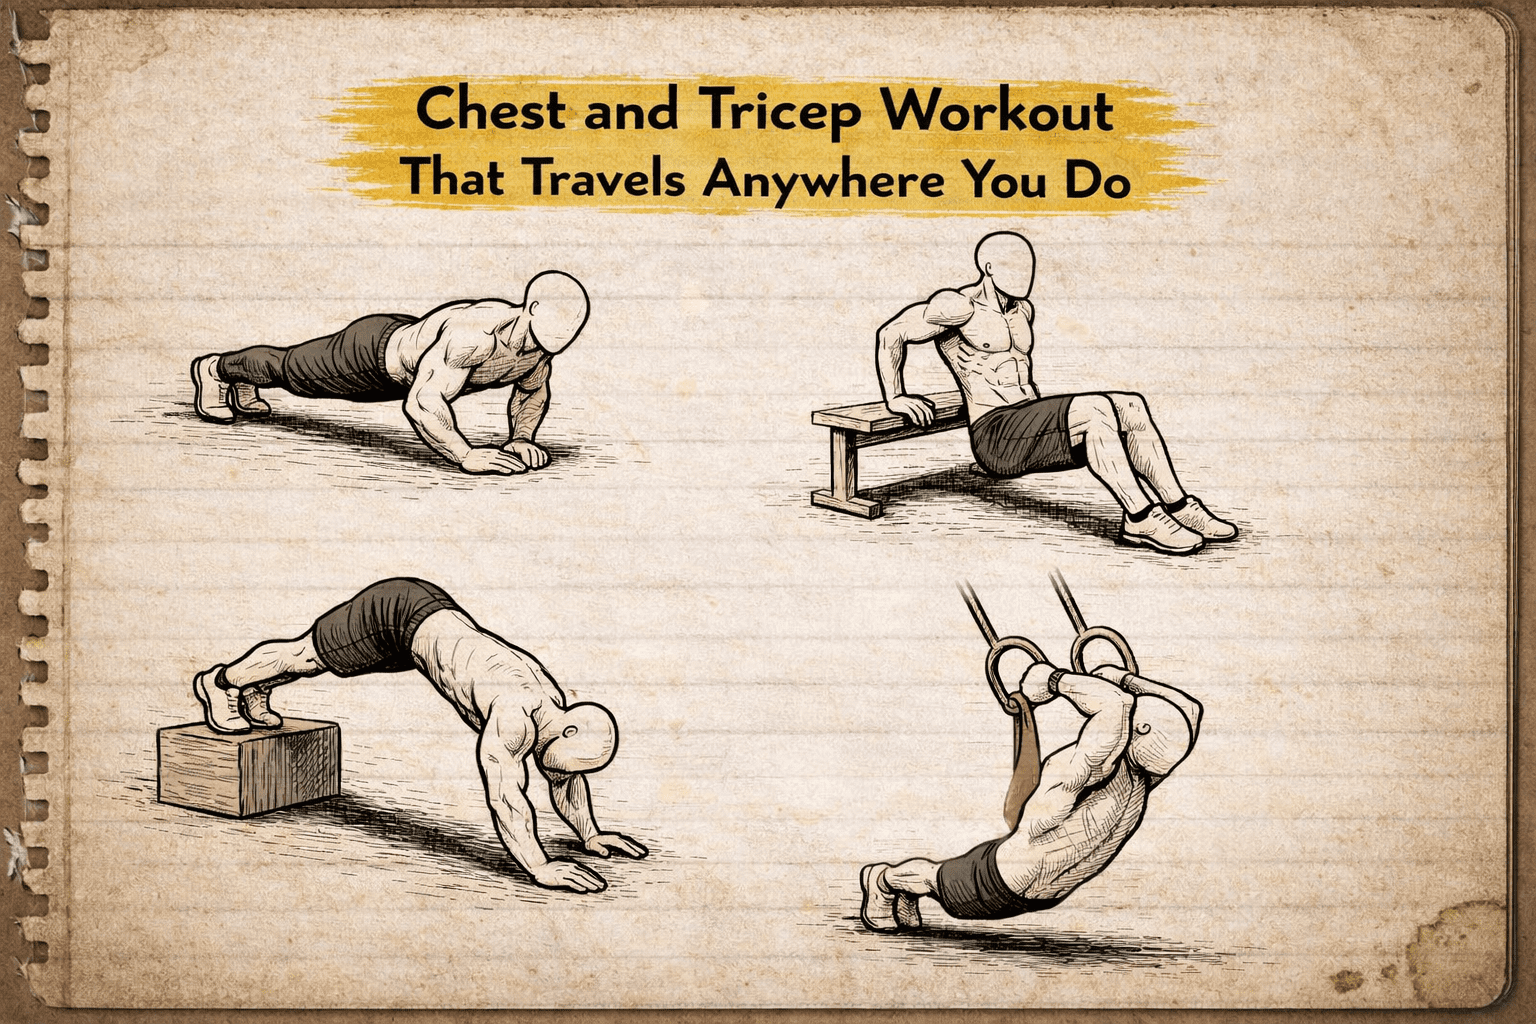
Most chest and tricep workouts are built for bodybuilders, not people who actually move through life.
You are not trying to look good under gym lighting. You want push strength that carries a ruck for miles, holds a handstand without shaking, and lets you move furniture without tweaking something. You want muscle that works when you need it, not just when you flex in a mirror. And you want to build it without spending an hour on a bench press station waiting for some guy to finish his fifth warmup set.
This is not about isolation. This is about integrated pressing power that crosses over into real movement. Rings, kettlebells, bodyweight angles, and intelligent progressions that respect your joints and your time.
Here is how you build chest and triceps that last.
Table of Contents
What You Actually Need
Forget the fully loaded home gym fantasy.
You do not need a bench, a barbell, or a cable machine to build serious pressing strength. The tools that deliver the most carryover to real life movement are the ones you can throw in a bag or hang from a tree branch. They force stability, challenge your core, and build strength that translates outside the gym.
The Short List:
- Gymnastic rings or a suspension trainer
- One or two kettlebells (16kg to 24kg for most people)
- A pullup bar or sturdy overhead structure
- Parallettes or two sturdy chairs
- A yoga mat or patch of grass
Rings are the single best investment you can make for upper body pressing. They cost less than a month of gym membership and force your stabilizers to work overtime. Every rep on rings recruits more muscle than the same movement on a fixed bar because your body has to control the instability. That instability is what builds coordination and joint resilience.
Kettlebells add a different dimension. The offset load challenges your core and shoulders in ways that dumbbells do not. A single kettlebell press requires your entire trunk to resist rotation. That is functional strength. That is what keeps your shoulder healthy when you are carrying uneven loads in the real world.
If you have nothing, you still have your bodyweight. Pushup variations alone can take you from beginner to advanced if you manipulate angles, tempo, and range of motion correctly. Add a backpack with some books or water bottles and you have progressive overload without spending a dollar.
How Chest and Triceps Actually Work Together
Your chest does not work alone.
Every pressing movement is a partnership between your pectorals, triceps, and anterior deltoids. When you push something away from your body, your chest initiates the movement and your triceps lock it out. The stronger your triceps, the more force you can produce at the end range of any press. The stronger your chest, the more power you generate at the start.
But here is what most programs miss: your triceps are also elbow and shoulder stabilizers. They do not just extend your arm. They protect your elbow joint under load and assist in overhead stability. That is why isolated tricep work is not enough. You need to train the triceps through full-range pressing, lockouts, and dynamic movements that mimic how you actually use your arms.
Your chest is divided into three functional zones. The upper fibers (clavicular head) are recruited more during incline pressing and when your arms move above shoulder height. The mid and lower fibers (sternal head) dominate during flat and decline angles. If you only do flat pushups or horizontal presses, you are undertraining a third of your chest.
The solution is not more exercises. It is smarter angles. Elevate your feet and you hit the upper chest harder. Elevate your hands and you shift emphasis to the lower chest and triceps. Rings let you adjust angles mid-set by changing your body position. That is why they belong in every minimalist training toolkit.
The Warm-Up That Actually Prepares You
Do not skip this.
Cold shoulders and tight triceps are how you end up with elbow tendinitis or a strained pec. A proper warm-up is not about breaking a sweat. It is about activating the muscles you are about to load and preparing your joints for ranges of motion they are about to move through.
Your Five-Minute Sequence:
- Arm circles (forward and reverse): 20 reps each direction. Keep your shoulders down and your core tight. This wakes up your rotator cuff and primes your shoulder capsule.
- Band pull-aparts or scapular pushups: 15 reps. Pull-aparts activate your rear delts and mid-traps, balancing out the anterior load you are about to place on your shoulders. Scapular pushups teach you how to protract and retract your shoulder blades under tension.
- Cat-cow stretches: 10 slow cycles. This mobilizes your thoracic spine, which directly affects how well you can get into pressing positions without compensating through your lower back.
- Hollow body holds: 2 sets of 20 seconds. This fires up your core and teaches you the body tension you will need during ring work and pushup variations.
- Pushup to downward dog: 10 reps. This dynamic movement takes your shoulders through flexion and extension while gently stretching your triceps and lats.
The goal is not to fatigue yourself. The goal is to move through the ranges and patterns you are about to load. Your first working set should feel dialed in, not like you are figuring out where your shoulder blades are supposed to be.
The Core Movement Patterns You Will Use
Strip it down to what actually matters.
There are thousands of chest and tricep exercises, but only a handful of movement patterns that deliver real strength gains. Every exercise in this program falls into one of four categories. Master these patterns and you can build your own sessions for life.
Horizontal Push (Chest Dominant):
Pushups, ring pushups, floor press with kettlebells. These are your bread and butter. They build pressing strength in the same plane you use when you push a car, shove open a heavy door, or press yourself off the ground. The chest does most of the work in the first two-thirds of the range. The triceps finish the lockout.
Incline Push (Upper Chest and Shoulder Emphasis):
Feet-elevated pushups, pike pushups, handstand pushup progressions. These shift the angle so your upper chest and shoulders take more load. They also prepare you for overhead strength, which crosses over into handstands, overhead presses, and anything that requires you to stabilize weight above your head.
Decline Push (Lower Chest and Tricep Emphasis):
Hands-elevated pushups, ring dips, parallel bar dips. These load your lower chest and place significant demand on your triceps. Dips are one of the most effective bodyweight tricep builders, but they are also easy to screw up. If your shoulders roll forward or you feel pinching in the front of your shoulder, you are not ready yet.
Tricep Extension and Isolation:
Ring or band tricep extensions, diamond pushups, close-grip kettlebell floor press. These target the triceps more directly by minimizing chest involvement. They are finishers, not foundations. Use them to add volume after your main pressing work, not as your primary movement.
Every session should include at least two of these patterns. If you hit all four in a single week, you are covering all the bases.
The Workout Structure That Builds Strength and Size
You do not need an hour.
This session is built for 35 to 45 minutes, warm-up included. It prioritizes compound movements, uses antagonist pairing to save time, and layers in volume without junk work. You will hit chest and triceps hard, then get on with your life.
Session Flow:
- Warm-Up: 5 minutes (see previous section)
- Primary Press: 4 to 5 sets of a challenging horizontal or incline press variation
- Secondary Press: 3 to 4 sets of a complementary angle or pattern
- Tricep Focus: 3 sets of a tricep-dominant movement
- Finisher: 2 to 3 sets of high-rep or time-under-tension work
Between each pressing set, insert a pull or core movement. This is called antagonist pairing. While your chest and triceps recover, you work the opposing muscle groups. This keeps your heart rate up, balances your session, and cuts your total training time by 20 to 30 percent.
Example pairing: after a set of ring pushups, do a set of ring rows. After a set of dips, do a set of hanging knee raises. You are not resting. You are actively recovering while building the other side of your body.
Rest periods matter. For strength work (sets of 3 to 6 reps), rest 90 seconds to 2 minutes after each superset. For hypertrophy work (sets of 8 to 12 reps), rest 60 to 90 seconds. For finishers, rest only as long as it takes to set up the next movement.
Primary Press Variations You Can Progress for Years
Start where you are, not where you wish you were.
Each of these movements has built-in progressions. You do not need new exercises every month. You need to get stronger at the ones that matter. Pick the variation that challenges you for 5 to 8 reps with good form, then ride it until you can do 10 to 12. Then level up.
Ring Pushups:
Set the rings at mid-thigh height to start. The lower the rings, the harder the movement. Your body is less stable on rings than on the floor, so even if you can crank out 50 floor pushups, rings will humble you. Keep your elbows at a 45-degree angle to your torso, not flared out wide. Protract your shoulder blades hard at the top of each rep. That protraction is what keeps your shoulders healthy and your serratus anterior engaged.
Progress by lowering the rings an inch at a time. Once you are doing full range pushups with the rings six inches off the ground, you are ready for ring pushups with your feet elevated.
Feet-Elevated Pushups:
Put your feet on a chair, bench, or couch. This shifts more load to your upper chest and shoulders. The higher your feet, the closer you get to a decline press angle. Start with feet at knee height. Work up to feet at hip height or higher.
Your core has to work harder here to prevent sagging hips. If your lower back arches, drop your feet lower until you can hold a straight line from head to heels. Once you can do 12 to 15 strict reps with feet elevated, add a weighted vest or backpack.
Pike Pushups:
Start in a downward dog position with your hips high and your hands shoulder-width apart. Lower your head toward the ground by bending your elbows. Press back up. This is a direct handstand pushup progression and one of the best bodyweight movements for building shoulder and upper chest strength.
Walk your feet closer to your hands to increase difficulty. The goal is to get your torso as vertical as possible. Once you can do 10 strict pike pushups with your feet on an elevated surface and your torso nearly vertical, you are ready to start working on wall-supported handstand pushups.
Ring Dips:
This is the king of bodyweight tricep and lower chest development. Set the rings at a height where you can jump or step into the top position. Lower yourself under control until your shoulders are level with your elbows. Press back up.
Do not go deeper than shoulders-at-elbows unless you have spent months building shoulder mobility and strength. Going too deep too soon is how people blow out their shoulders. If you feel pinching or clicking in the front of your shoulder, stop. Go back to bench dips or narrow pushups until your shoulder stability improves.
Progress by adding a weighted vest, a dip belt, or slowing down the eccentric (lowering phase) to 4 or 5 seconds per rep.
Secondary Press Options That Fill the Gaps
These are not afterthoughts.
Your secondary press is where you hit a different angle or pattern than your primary movement. If you opened with ring pushups (horizontal), your secondary might be pike pushups (incline) or dips (decline). This ensures you are not overloading one part of your chest while neglecting another.
Kettlebell Floor Press:
Lie on your back with a kettlebell in each hand. Press them straight up, then lower until your triceps touch the ground. The floor acts as a natural stopping point, which protects your shoulders and allows you to press heavier loads safely.
This movement hammers your triceps because the shortened range of motion keeps constant tension on the lockout portion of the press. It also teaches you to generate power from a dead stop, which builds explosive strength.
Progress by adding weight, slowing down the tempo, or doing single-arm presses to increase core demand.
Close-Grip Pushups (Diamond Pushups):
Place your hands together under your chest so your thumbs and index fingers form a diamond shape. This shifts almost all the load to your triceps. Keep your elbows tight to your body as you lower and press.
If full diamond pushups are too hard, start with your hands just inside shoulder width. Gradually bring them closer together over weeks. If they are too easy, elevate your feet or add a weighted vest.
Archer Pushups:
Start in a wide pushup position. As you lower, shift your weight to one side, keeping that arm bent while the other arm stays nearly straight. Press back up and repeat on the other side. This is a unilateral strength builder that prepares you for one-arm pushup progressions.
Archer pushups expose strength imbalances fast. Most people discover one side is significantly weaker. That is valuable information. Spend extra sets on the weaker side until it catches up.
Tricep-Focused Movements That Add Volume Without Wrecking You
Isolation is not a dirty word.
After your primary and secondary presses, your triceps have already done a ton of work. But they can handle more volume than your chest and shoulders, and adding focused tricep work helps lock in the strength gains you just built.
Ring Tricep Extensions:
Set the rings at waist height. Grab them and walk your feet forward so your body is at a 45-degree angle. Keeping your elbows high and your upper arms stationary, bend your elbows to lower your body. Extend your triceps to press back up.
This is a bodyweight skull crusher. It is brutal. Start at a higher angle (more vertical body position) if you cannot control the movement. Progress by walking your feet forward to increase the angle.
Band Overhead Tricep Extensions:
Loop a resistance band around a pullup bar or anchor point above your head. Face away from the anchor, grab the band with both hands, and extend your arms overhead. Bend your elbows to lower your hands behind your head, then extend back to the starting position.
This hits the long head of the triceps, which is often undertrained in pressing-only programs. The long head crosses both the shoulder and elbow joint, so training it through a full overhead range improves shoulder stability as well as arm strength.
Bench Dips:
Sit on the edge of a bench or chair with your hands next to your hips. Walk your feet out and lower your body by bending your elbows. Press back up. Keep your elbows pointing straight back, not flared out to the sides.
This is a great finisher if your shoulders are too fried for ring dips. You can add weight by placing a kettlebell or backpack on your lap. You can increase range by elevating your feet on another surface.
The Finishers That Build Endurance and Tendon Resilience
Your muscles recover faster than your tendons.
Finishers serve two purposes. They add metabolic stress, which drives hypertrophy (muscle growth). And they build work capacity in your tendons and connective tissue, which is what keeps you training without injuries for decades.
Pushup Burnout (1 to 2 sets):
Pick an easier pushup variation than you used for your primary work. Set a timer for 90 seconds. Do as many reps as possible with perfect form. When you hit failure, rest 10 seconds in the plank position, then keep going. Repeat until the timer runs out.
This teaches your muscles to work under fatigue. It also builds the kind of endurance that lets you move furniture for an hour or knock out a long day of physical work without falling apart.
Isometric Holds (2 to 3 sets):
Hold the bottom position of a pushup, ring support hold, or dip for maximum time. Aim for 20 to 60 seconds. Your muscles are under tension but not moving. This builds strength in stretched positions and bulletproofs your connective tissue.
Ring support holds are particularly valuable. Just holding your bodyweight on rings with your arms locked out and your shoulders active forces your stabilizers to fire hard. It is boring. It is uncomfortable. It works.
Tempo Pushups (2 sets of 6 to 8 reps):
Lower for 5 seconds. Pause at the bottom for 2 seconds. Press up in 1 second. The slow eccentric builds strength and control. The pause eliminates momentum. Together they turn a simple pushup into a serious strength builder.
Use a variation you can control perfectly. This is not the time to test your limits. This is the time to own the movement.
How to Program This Into Your Week
Frequency beats intensity for long-term strength.
You do not need to destroy your chest and triceps once a week. You need to stimulate them two to three times per week with enough volume to grow, but not so much that you cannot recover. Your central nervous system, joints, and tendons need time to adapt.
Option 1: Two Sessions Per Week
Monday: Full chest and tricep session (all four sections: primary, secondary, tricep focus, finisher)
Thursday: Repeat the same session or swap in different movement variations at the same intensity
This works if you are also training legs, back, and conditioning on other days. Two solid pressing sessions per week is enough to build strength and size without overtraining.
Option 2: Three Sessions Per Week
Monday: Heavy primary press focus (lower reps, longer rest, strength emphasis)
Wednesday: Volume secondary press focus (moderate reps, moderate rest, hypertrophy emphasis)
Friday: Lighter skill and endurance work (higher reps, shorter rest, finisher emphasis)
This splits the work across three sessions, which allows you to push harder in each one without accumulating as much fatigue. It also gives you more opportunities to practice the movement patterns, which accelerates skill development.
Option 3: Integrate Into Full-Body Sessions
If you train full-body three or four times per week, include one or two pressing movements per session. Pair them with a pull movement, a lower body movement, and core work. This spreads the volume across the week and prevents any one muscle group from getting overloaded.
Example: Session A includes ring pushups and pullups. Session B includes pike pushups and rows. Session C includes dips and chinups. By the end of the week, you have hit every pressing angle without dedicating an entire session to chest and triceps.
Common Mistakes That Stall Progress
You are probably making at least one of these.
Even experienced lifters fall into patterns that limit their gains. Most of these mistakes are not obvious. They creep in slowly and quietly kill your progress over months.
Flaring Your Elbows Too Wide:
When your elbows flare out past 45 degrees from your torso, you shift stress from your chest and triceps onto your shoulder joints. This feels easier in the moment, but it sets you up for impingement and rotator cuff issues down the road. Keep your elbows at a 30 to 45-degree angle on all pressing movements. Your shoulders will thank you in ten years.
Losing Shoulder Blade Control:
Your shoulder blades should protract (spread apart) at the top of every pushup and retract (squeeze together) at the bottom. If your shoulder blades stay pinned back the entire time, you are not using your serratus anterior, which is a key stabilizer. If they wing out or slide around randomly, you lack the strength to control the movement. Film yourself from the side. Watch your shoulder blades. Fix the pattern before adding weight or difficulty.
Sagging Hips or Piking Up:
Your body should form a straight line from head to heels during all pushup variations. If your hips sag, your lower back is compensating for a weak core. If your hips pike up, you are making the movement easier by reducing the range of motion. Both patterns reduce the effectiveness of the exercise and increase injury risk. Brace your core like someone is about to punch you in the stomach. Hold that tension for the entire set.
Chasing Reps Instead of Quality:
Thirty sloppy pushups do not build as much strength as fifteen perfect ones. Every rep should look identical. Same range of motion. Same tempo. Same body position. The moment your form breaks down, the set is over. Rest, reset, and go again. Quality reps build strength. Junk reps build bad habits.
Ignoring Pain Signals:
Discomfort is normal. Sharp pain is not. If you feel a pinch, pop, or stabbing sensation in your shoulder, elbow, or chest, stop immediately. Pain is your body telling you something is wrong. Pushing through it does not make you tougher. It makes you injured. Back off the intensity, check your form, and address the issue before it becomes chronic.
How to Progress Without Plateau
Progression is not linear.
You will not add reps or weight every single session. Some weeks you will feel strong. Some weeks you will feel flat. The key is to track your work over months, not days, and use multiple progression methods so you always have a way forward.
Add Reps:
If you did 3 sets of 8 ring pushups last week, aim for 3 sets of 9 this week. Once you hit 3 sets of 12, move to a harder variation or add weight.
Add Sets:
If adding reps stalls out, add another set. Go from 3 sets to 4 sets at the same rep count. This increases total volume, which drives adaptation.
Increase Time Under Tension:
Slow down the eccentric (lowering phase) or add pauses. A 3-second eccentric turns an 8-rep set into 24 seconds of tension instead of 12. Your muscles do not count reps. They respond to tension and fatigue.
Decrease Rest Periods:
If you are resting 2 minutes between sets, try 90 seconds. If you are resting 90 seconds, try 60. Shorter rest increases the metabolic demand and builds work capacity.
Change the Angle:
Lower the rings. Elevate your feet. Shift from two arms to one arm. Small changes in body position can make a familiar movement feel brand new.
Add External Load:
Throw a weighted vest on. Hold a kettlebell on your back during pushups. Hang a dip belt with plates during dips. Progressive overload does not have to be complicated.
Track your sessions. Write down what you did. Compare it to last week. If you did more total reps, more total sets, or the same work in less time, you progressed. That is all that matters.
Mobility Work That Keeps Your Shoulders Healthy
Your shoulders are not designed to only press.
If all you do is push, your shoulders will migrate forward, your chest will tighten, and your posture will collapse. You need to balance pressing volume with pulling volume and dedicated mobility work.
Daily Shoulder Circles:
Forward and reverse, 20 reps each direction, every single morning. This takes 60 seconds and keeps your shoulder capsule lubricated. Do it before you check your phone.
Wall Slides:
Stand with your back against a wall, arms overhead in a Y position. Slide your arms down the wall while keeping your elbows, wrists, and back of your hands in contact with the wall. Slide back up. Do 10 to 15 reps daily. This drills overhead mobility and scapular control.
Thread the Needle:
Start on all fours. Reach one arm under your body and across to the opposite side, lowering your shoulder and head to the ground. Hold for 5 breaths. Return and repeat on the other side. This opens up your thoracic spine and shoulders, which directly improves your pressing mechanics.
Band Dislocates:
Hold a resistance band or towel with a wide grip. Raise it overhead, then continue the arc backward and down toward your hips, keeping your arms straight. Reverse the movement. Do 10 to 15 reps daily. This builds shoulder flexibility and strengthens the rotator cuff through a full range of motion.
Spend five minutes per day on mobility work. It is boring. It is not sexy. It is the difference between training hard in your 40s and 50s or sitting on the sidelines with a torn rotator cuff.
Nutrition and Recovery Essentials
You do not build muscle in the gym.
You build it in the 23 hours after you leave. Training is the stimulus. Recovery is where adaptation happens. If you are not eating enough protein, sleeping enough hours, or managing stress, your progress will stall no matter how perfect your program is.
Protein Intake:
Aim for 1.6 to 2.2 grams of protein per kilogram of bodyweight per day. For a 180-pound (82 kg) person, that is roughly 130 to 180 grams of protein daily. Spread it across three or four meals. Your body can only process so much protein at once, so front-loading a massive steak dinner does not make up for skipping breakfast and lunch.
Protein stimulates muscle protein synthesis, which is the process your body uses to repair and grow muscle tissue. Without adequate protein, you are just breaking down muscle without giving your body the raw materials to rebuild it stronger.
Carbohydrates and Fats:
Carbs fuel your training sessions and replenish glycogen stores. Fats support hormone production, including testosterone, which is critical for muscle growth and recovery. Do not cut out entire macronutrient groups unless you have a medical reason. Your body needs all three.
Sleep:
Seven to nine hours per night, non-negotiable. Sleep is when your body releases growth hormone, repairs damaged tissue, and consolidates the motor patterns you practiced in training. Chronic sleep deprivation tanks testosterone, increases cortisol (a stress hormone that breaks down muscle), and kills your motivation to train.
If you are not sleeping, you are not recovering. If you are not recovering, you are not getting stronger.
Stress Management:
Your body does not differentiate between training stress and life stress. If you are crushed at work, fighting with your partner, or doom-scrolling until midnight, your cortisol levels are elevated. High cortisol interferes with muscle growth and fat loss.
Find a way to manage stress that works for you. Walking. Breathing exercises. Time in nature. Whatever it is, make it non-negotiable. Your training depends on it.
How to Scale This for Beginners
Start simple.
If you cannot do a single ring pushup or dip, do not force it. There is no shame in starting with easier variations. Every expert was once a beginner. The difference is they stayed consistent long enough to get good.
Beginner Primary Press: Incline Pushups
Place your hands on a bench, table, or countertop. The higher the surface, the easier the movement. Start at a height where you can complete 8 to 10 strict reps with perfect form. Each week, lower the surface by a few inches. Once you can do 15 to 20 pushups with your hands on a surface 12 inches off the ground, you are ready for floor pushups.
Beginner Secondary Press: Kneeling Pushups
Drop to your knees instead of holding a full plank. Keep your body in a straight line from head to knees. Lower your chest to the ground, then press back up. This reduces the load by roughly 30 to 40 percent compared to full pushups.
Beginner Tricep Focus: Bench Dips
Use a bench or sturdy chair. Keep your feet on the ground and knees bent at 90 degrees to start. As you get stronger, straighten your legs. Once you can do 15 to 20 reps with straight legs, elevate your feet on another surface.
Beginner Finisher: Plank Holds
Hold a plank position for maximum time. Focus on keeping your hips level, core braced, and shoulder blades protracted. Work up to 60 seconds. Once you can hold a plank for a minute, you are ready to start adding pushup volume.
Progress takes time. If you are adding one rep per week or lowering your incline surface by two inches per week, you are winning. Do not compare yourself to anyone else. Compare yourself to last week.
How to Scale This for Advanced Lifters
Make it harder.
If regular ring pushups and dips feel easy, you have earned the right to make things interesting. Advanced progressions require more strength, more stability, and more skill. They also carry higher injury risk if you rush into them before you are ready.
Advanced Primary Press: Ring Pushups with Feet Elevated and Weighted Vest
Set the rings low, elevate your feet, and throw on a 20 to 40-pound vest. Lower yourself until your chest touches your hands, then press back up. This is one of the most challenging horizontal presses you can do without a barbell.
Advanced Secondary Press: Handstand Pushups
Kick up into a handstand against a wall. Lower your head to the ground under control, then press back up. If you can do 5 strict handstand pushups, you have world-class pressing strength. Most people never get here. That is why it is worth chasing.
Advanced Tricep Focus: Archer Ring Dips
Perform a ring dip, but shift your weight to one side as you lower, keeping one arm straighter than the other. This is a one-arm dip progression and one of the most difficult bodyweight tricep movements in existence.
Advanced Finisher: Pseudo Planche Pushups
Start in a pushup position, but walk your hands back toward your hips and lean forward so your shoulders are in front of your hands. Lower and press while maintaining that forward lean. This builds the straight-arm strength required for planche progressions and absolutely torches your chest, shoulders, and core.
Advanced training is not about doing more exercises. It is about doing harder variations of the same exercises. Master the basics first. Then make the basics harder.
Troubleshooting When Progress Stalls
Every lifter hits plateaus.
You are adding reps for weeks, then suddenly you stall. You cannot get past 8 reps on ring dips. Your pike pushups feel weaker instead of stronger. This is normal. The solution is not to panic or switch programs. The solution is to diagnose the issue and make a small adjustment.
You Are Not Recovering:
If you are training chest and triceps three or four times per week and not gaining strength, you are probably overtraining. Cut back to two sessions per week for a month. Focus on sleep and nutrition. Let your body catch up.
You Are Not Eating Enough:
You cannot build muscle in a calorie deficit unless you are a complete beginner or carrying significant body fat. If your bodyweight has been flat for months and your strength has stalled, you need to eat more. Add 200 to 300 calories per day and track your progress for four weeks.
Your Form Is Breaking Down:
Film yourself. Watch the playback. Compare it to how you looked two months ago. If your elbows are flaring more, your hips are sagging, or your range of motion has decreased, your form is degrading. Drop the difficulty and rebuild your technique.
You Are Not Varying the Stimulus:
If you have been doing the same workout for six months, your body has adapted. Swap in different movement variations. Change your rep ranges. Add tempo work or isometric holds. Your body responds to novelty.
You Have a Weak Link:
Sometimes your chest and triceps are strong enough, but your core or shoulder stability is the limiting factor. If your pushups feel wobbly or your lockout on dips is shaky, spend a few weeks hammering planks, hollow body holds, and ring support holds. Strengthen the weak link and your pressing will improve.
Sample Four-Week Progression
Here is what an actual month of training looks like.
This is not theory. This is a real progression you can follow starting today. Adjust the movements based on your current ability level, but keep the structure intact.
Week 1: Foundation
Session 1:
- Ring Pushups: 4 sets of 6 reps
- Pike Pushups: 3 sets of 8 reps
- Ring Tricep Extensions: 3 sets of 10 reps
- Pushup Burnout: 1 set of max reps in 90 seconds
Session 2:
- Feet-Elevated Pushups: 4 sets of 8 reps
- Kettlebell Floor Press: 3 sets of 10 reps per arm
- Bench Dips: 3 sets of 12 reps
- Plank Hold: 2 sets of 45 seconds
Week 2: Add Volume
Session 1:
- Ring Pushups: 4 sets of 7 reps
- Pike Pushups: 3 sets of 9 reps
- Ring Tricep Extensions: 3 sets of 11 reps
- Pushup Burnout: 1 set of max reps in 90 seconds
Session 2:
- Feet-Elevated Pushups: 4 sets of 9 reps
- Kettlebell Floor Press: 3 sets of 11 reps per arm
- Bench Dips: 3 sets of 13 reps
- Plank Hold: 2 sets of 50 seconds
Week 3: Add Intensity
Session 1:
- Ring Pushups: 5 sets of 6 reps
- Pike Pushups: 4 sets of 8 reps
- Ring Tricep Extensions: 3 sets of 12 reps
- Tempo Pushups (5-2-1): 2 sets of 6 reps
Session 2:
- Feet-Elevated Pushups: 5 sets of 8 reps
- Kettlebell Floor Press: 4 sets of 10 reps per arm
- Bench Dips: 3 sets of 15 reps
- Ring Support Hold: 2 sets of 30 seconds
Week 4: Deload
Session 1:
- Ring Pushups: 3 sets of 5 reps
- Pike Pushups: 2 sets of 6 reps
- Ring Tricep Extensions: 2 sets of 8 reps
- Mobility Work: 10 minutes
Session 2:
- Feet-Elevated Pushups: 3 sets of 6 reps
- Kettlebell Floor Press: 2 sets of 8 reps per arm
- Bench Dips: 2 sets of 10 reps
- Mobility Work: 10 minutes
The deload week is not optional. It is when your body supercompensates and builds the strength you earned in weeks 1 through 3. Skip the deload and you risk overtraining, injury, and burnout.
Frequently Asked Questions
These come up every single time.
Can I build a big chest without a bench press?
Yes. Bodyweight progressions, ring work, and kettlebell pressing can absolutely build a strong, well-developed chest. The bench press is a tool, not a requirement. Gymnasts have some of the best chest development in the world and most of them never touch a barbell.
How often should I train chest and triceps?
Two to three times per week is the sweet spot for most people. More than three sessions per week and you risk overtraining. Less than two and you are not providing enough stimulus to drive adaptation.
Should I train chest and triceps on the same day or split them up?
They work together in every pressing movement, so training them together makes sense. Splitting them into separate days is unnecessary unless you are doing an extremely high volume bodybuilding program, which is not what this audience needs.
What if I feel pain in my shoulder during dips?
Stop doing dips. Pain is a signal, not a challenge to overcome. Go back to pushup variations and work on shoulder mobility and stability. Once you can do 20 strict pushups and hold a ring support for 45 seconds without discomfort, try dips again.
How long does it take to see results?
Strength gains show up in 2 to 4 weeks. Visible muscle growth takes 8 to 12 weeks of consistent training and proper nutrition. If you are not seeing progress after 12 weeks, your program, nutrition, or recovery needs adjustment.
Can I do this workout if I am over 40?
Absolutely. In fact, this style of training is better for older lifters than heavy barbell work. Rings and bodyweight movements are easier on your joints and build functional strength that carries over into daily life. Just pay extra attention to warm-ups, mobility work, and recovery.
Building chest and triceps is not about chasing a look. It is about building push strength that serves your life. Strength that lets you handle yourself in any physical situation. Strength that does not require a gym membership or a pile of equipment.
You do not need a bench press. You do not need a spotter. You need rings, a few kettlebells, and the willingness to show up consistently. The movements are simple. The progressions are clear. The results are real.


ABOUT THE AUTHOR
Carlos Grider is a former U.S. Marine, CrossFit Level 1 trainer, certified personal trainer, and the creator of Forge the Flow. After nearly a decade supporting combat operations and special operations in austere environments — and another decade traveling across 65+ countries as a nomad and adventure athlete — Carlos distilled everything he learned about staying strong, capable, and resilient without a gym into the Forge the Flow training system. He has trekked solo to Everest Base Camp, surfed Bali through the pandemic, trained Muay Thai in Thailand, and run self-guided marathons across four continents — all maintained on minimalist training built for real life. He writes about the fitness methods that actually travel.
Click here to learn more about Carlos's story.