Your hips and knees dictate how well you move, how much power you generate, and how long you stay in the game.
When these joints lock up, everything suffers. Your squat depth disappears. Your hip hinge gets sloppy. That kettlebell swing that felt smooth last month now grinds through restricted range. You compensate without realizing it, loading patterns shift, and suddenly your lower back or ankles start talking back. This isn’t about age or bad genetics. It’s about neglecting the foundation of human movement.
Hip and knee mobility isn’t some extra credit warm-up you skip when time gets tight. It’s the infrastructure that supports every loaded movement, every explosive effort, every long ruck, and every recovery session. Without it, you’re building strength on a compromised base. With it, you unlock ranges you forgot you had, move with confidence under load, and keep training hard without breaking down.
This guide gives you the complete system: why these joints matter, how mobility actually works, and the exact exercises to build hips and knees that enhance performance instead of limiting it.
Why Hip and Knee Mobility Matters More Than You Think
These two joint complexes control nearly every athletic movement you perform. Your hips are the engine for power generation. Your knees are the hinge that transfers force between your hips and the ground. When either loses range or control, the entire kinetic chain compensates poorly.
Restricted hip mobility forces your lumbar spine (your lower back) to compensate and contribute range it shouldn’t provide. Limited knee flexion prevents you from hitting proper squat depth, which means you miss the glute and hamstring development that comes from full range work. Stiff hips kill your ability to hinge properly, turning deadlifts and swings into lower back exercises instead of posterior chain movements. These aren’t minor technical issues. They’re performance leaks that compound over time.
Mobility isn’t flexibility. Flexibility is passive range you can access when relaxed. Mobility is active, controlled range you can use under load and at speed. You need both strength and flexibility working together across the full range of motion your joints are designed to access. A flexible hip that can’t stabilize through deep ranges is just as limiting as a tight hip that won’t move past 90 degrees.
Recovery and injury resistance hinge on this too. Joints that move well distribute force evenly across tissues. Joints that don’t create friction, compensation, and concentrated stress on structures that weren’t designed to handle it. Knee pain often traces back to limited ankle or hip mobility. Hip tightness frequently shows up as lower back discomfort. Address the mobility deficit, and the pain often resolves without needing to back off training intensity.
Your performance ceiling lives inside your available range. You can’t generate power through ranges you don’t own. You can’t move efficiently through patterns your body doesn’t trust. And you can’t load movements safely if your joints compensate their way through every rep. Mobility work expands what’s possible, making every other aspect of your training more effective.
The Underlying Principles of Hip and Knee Mobility
Joint mobility depends on three factors: tissue length, joint capsule health, and neuromuscular control.
Tissue length refers to the muscles, tendons, and fascia that cross the joint. If your hip flexors are chronically shortened from sitting, your hip extension range suffers. If your hamstrings are tight, knee extension and hip flexion both pay the price. Lengthening these tissues requires consistent, progressive stretching with enough duration and frequency to create adaptation.
Joint capsule health is about the actual joint structure. The hip and knee are both synovial joints (fluid-filled cavity joints that connect our bones) surrounded by capsules that can stiffen from underuse or inflammation. Moving through full ranges regularly keeps synovial fluid circulating and prevents capsular restrictions. This is why static stretching alone doesn’t solve mobility problems. You need movement that takes the joint through its full available range under control. Using that range helps your joints keep that range.
Neuromuscular control is the nervous system’s willingness to let you access range. Your brain and the rest of your nervous system protect you by limiting range it perceives as unsafe. If you lack strength or stability in a position, your nervous system restricts access to that position. This is why loaded mobility work and end-range strengthening are so effective. You’re teaching your brain that deep ranges are safe and controlled, even under load, which expands the movement envelope you can access.
Effective mobility training addresses all three simultaneously. Stretching alone lengthens tissue but doesn’t build control. Strength work alone builds control but often through limited ranges. The sweet spot combines stretching, active range exploration, and strength work at end ranges. This trifecta creates durable, usable mobility that transfers directly into performance.
Consistency beats intensity here. Your nervous system adapts to what you do regularly, not what you do occasionally with heroic effort. Ten minutes of daily mobility work outperforms an hour-long session once a week. Frequency builds trust with your nervous system, maintains the flexibility of your tissues before they stiffen, and creates lasting adaptation in tissue length and joint capsule health.
Progressive overload applies to mobility just like strength. Start with ranges you can control cleanly. Add depth, duration, or load gradually. Push too hard too fast, and your nervous system clamps down harder. Progress systematically, and you’ll access ranges you haven’t owned in years without forcing anything.
Now that you understand why mobility exerises and regular mobility training are valuable, and how they deliver the health, movement range, and joint durability we’re looking for, let’s review the actual movements worth adding to your daily hip and knee mobility sessions.
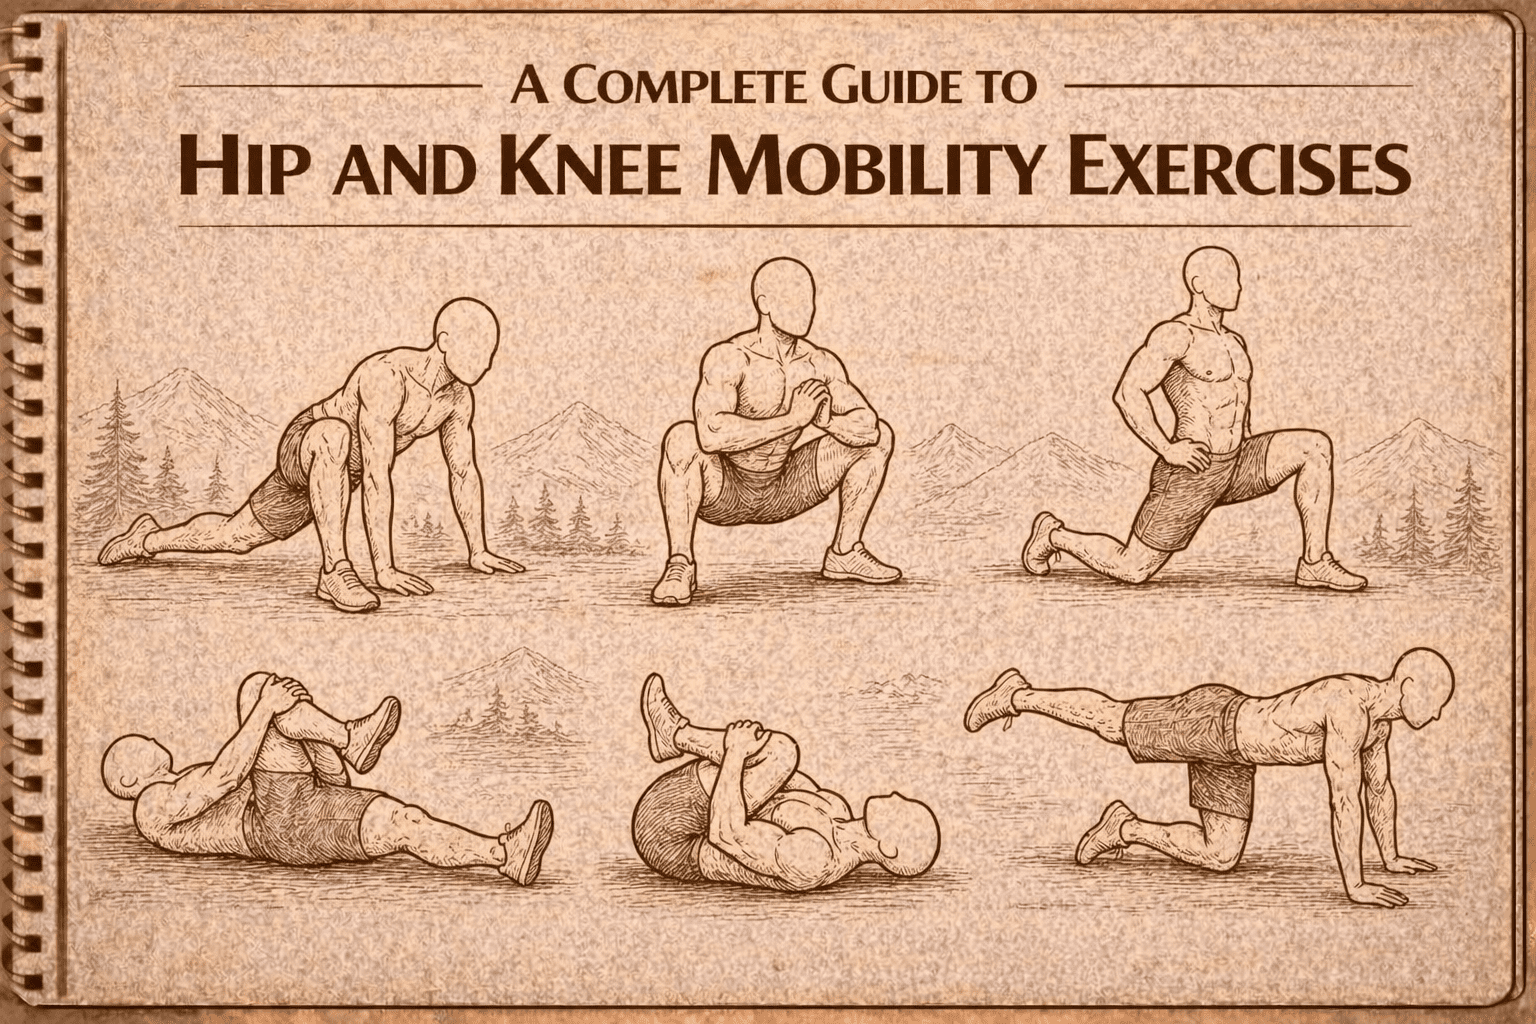
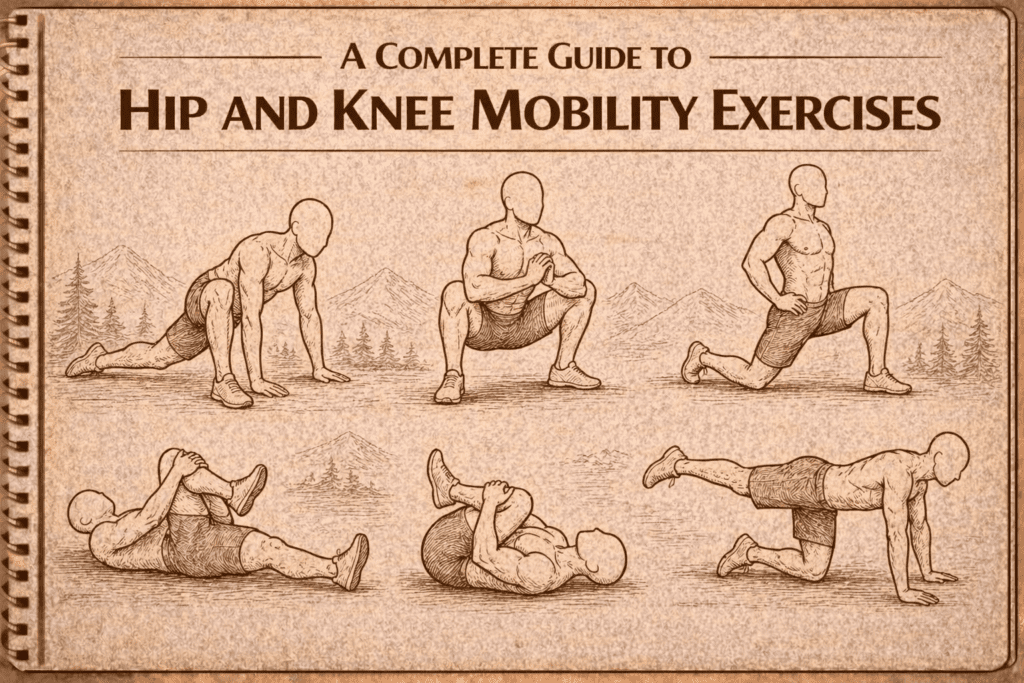
Essential Hip Mobility Exercises
These movements target the most common hip restrictions and build functional range that transfers into loaded training. Most people lose hip internal rotation (the movement of the thigh bone inward, twisting toward the body’s midline within the hip socket), hip flexion (the movement of bringing the thigh closer to the torso or lifting the knee toward the chest), and hip extension (the movement of straightening the hip joint, bringing the thigh backward behind the body’s midline) first. These exercises restore all three movements while building the control that makes new range usable.
90/90 Hip Stretch
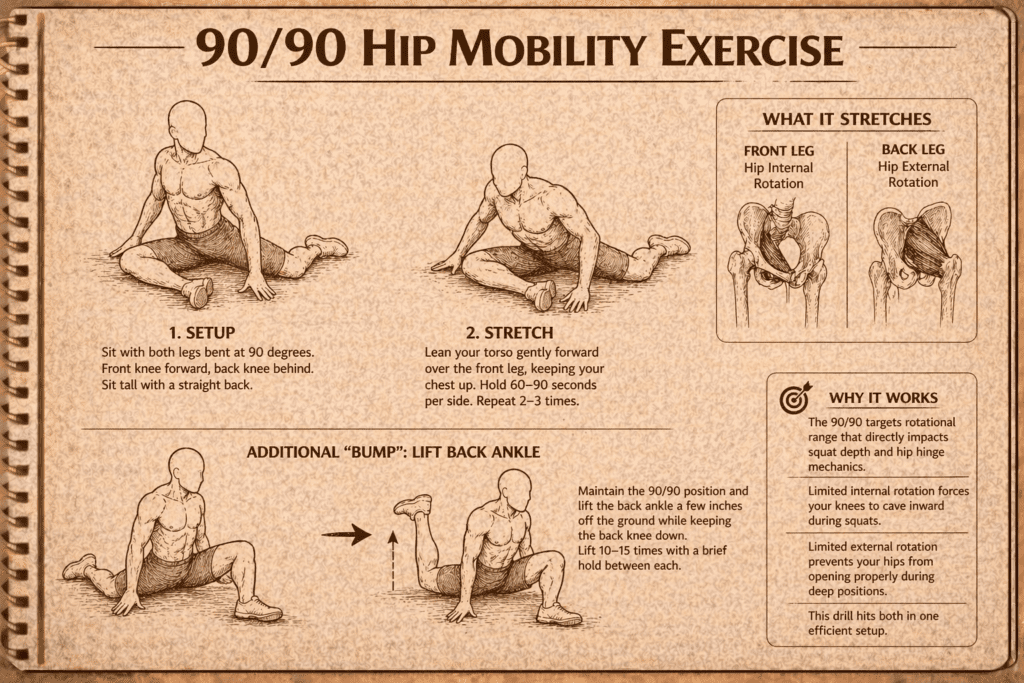
Sit on the ground with one leg in front of you, with the knee bent at 90 degrees, knee pointing forward, and the other leg behind you also bent at the knee 90 degrees. Both knees and both ankles should form right angles. Sit tall with a straight back, avoiding compensating with the lower back, and lean your torso gently forward over the front leg, keeping your chest up.
This position stretches hip internal rotation on the front leg and hip external rotation on the back leg simultaneously. Most people discover they can’t even get into the position cleanly at first. That’s the point. Work toward a clean setup before worrying about depth. Hold for 60 to 90 seconds per side, breathing deeply and allowing the hips to relax into the stretch. Repeat 2 to 3 times per side.
As an additional “bump” in the exercise, maintaining the 90/90 position, attempt to lift the bank ankle a few inches off the ground while keeping the back knee touching the ground and in place. Lifting the back ankle 10 to 15 times, with a brief hold between each, is great way to enhance this hip mobility exercise.
Why it works: The 90/90 targets rotational range that directly impacts squat depth and hip hinge mechanics. Limited internal rotation forces your knees to cave inward during squats. Limited external rotation prevents your hips from opening properly during deep positions. This drill hits both in one efficient setup.
Cossack Squat

Stand with feet wide, toes pointed slightly out. Shift your weight to one side and bend that knee while keeping the other leg straight. Your heel stays down on the bent leg side, and your straight leg stretches the adductors. Keep your torso upright and your chest proud. Push through the bent leg to return to center, then repeat on the other side.
Start with bodyweight only, focusing on control and depth. As you build range, hold a light kettlebell at chest height for counterbalance and added load. Work sets of 5 to 8 reps per side, moving slowly through the full range.
This movement builds active hip mobility through a lateral shift pattern that most people rarely train. It strengthens the adductors through deep ranges while improving ankle and hip flexibility simultaneously. The Cossack squat also exposes asymmetries fast. Most people have a significantly weaker or tighter side that needs extra attention.
Deep Squat Holds
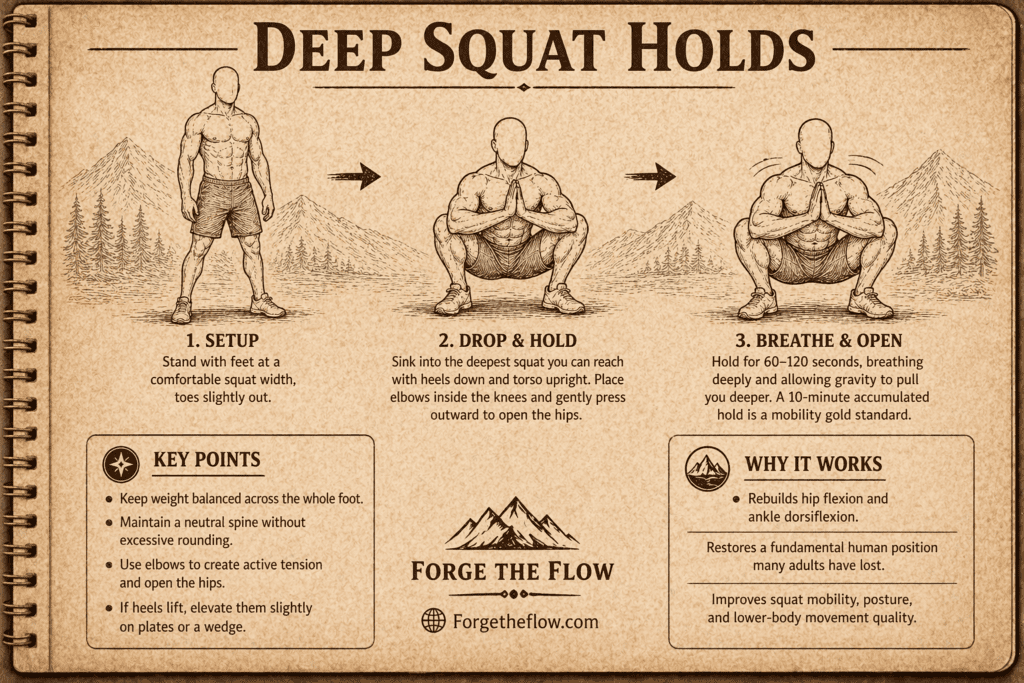
Drop into the deepest squat position you can achieve with your heels down and your torso upright. Place your elbows inside your knees and gently press outward to open your hips. Hold this position for 60 to 120 seconds at a time, breathing deeply and allowing gravity to pull you deeper. Holding the bottom of the squat for 10 minutes a mobility gold standard.
Key points:
- Keep your weight balanced across your whole foot, not just your toes
- Maintain a neutral spine without excessive rounding
- Use your elbows to create active tension, by potentially pushing your knees outward with your elbows, that encourages hip opening
- If your heels lift, elevate them slightly on plates or a wedge until you build the ankle mobility to keep them down
The deep squat is a fundamental human position that most adults have lost. Spending time here rebuilds hip flexion, ankle dorsiflexion, and thoracic extension all at once. It’s both a mobility drill and a diagnostic tool. The quality of your deep squat reveals every limitation in your lower body.
Hip Flexor Stretch with Posterior Tilt
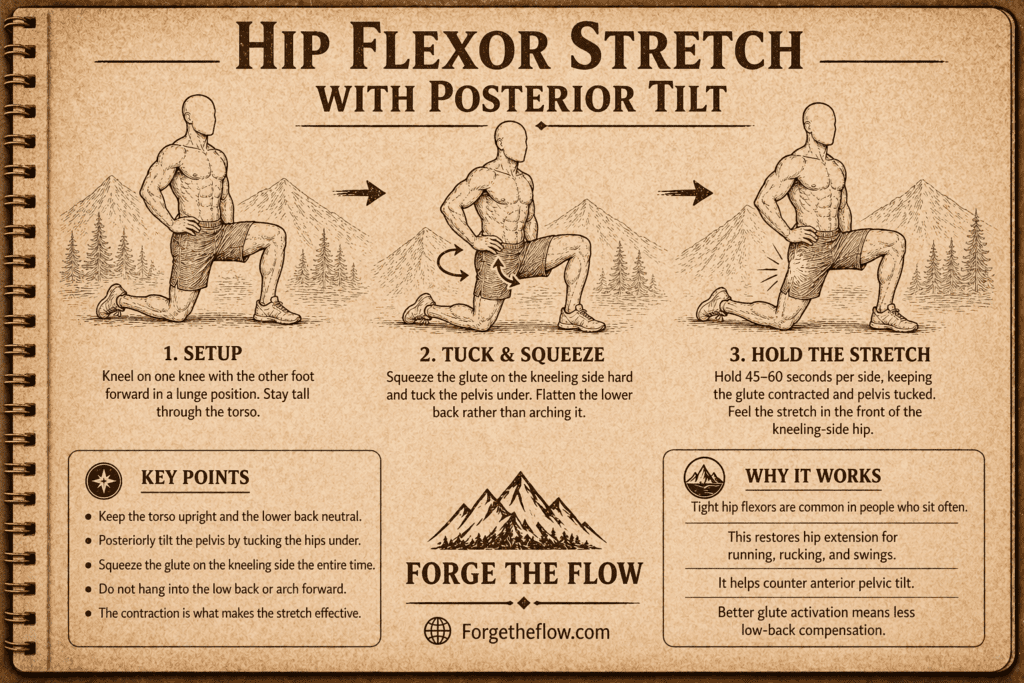
Kneel on one knee with the other foot forward in a lunge position. Squeeze your glute on the kneeling side hard and tuck your pelvis under by rotating your hips posteriorly (top of the pelvis tilts back and the bottom scoops forward, flattening the lower back and tucking the glutes). You should feel a strong stretch through the front of your hip on the kneeling side without arching your lower back.
Hold for 45 to 60 seconds per side, maintaining the posterior pelvic tilt and glute contraction throughout. The contraction is what makes this effective. Without it, you’re just hanging on passive tension and likely compensating through your lower back.
Tight hip flexors are epidemic in anyone who sits regularly. They limit hip extension during running, rucking, and kettlebell swings. They anteriorly tilt your pelvis, which shuts down glute activation and overworks your lower back. This stretch directly counters that pattern when done with proper technique.
Shinbox Transitions
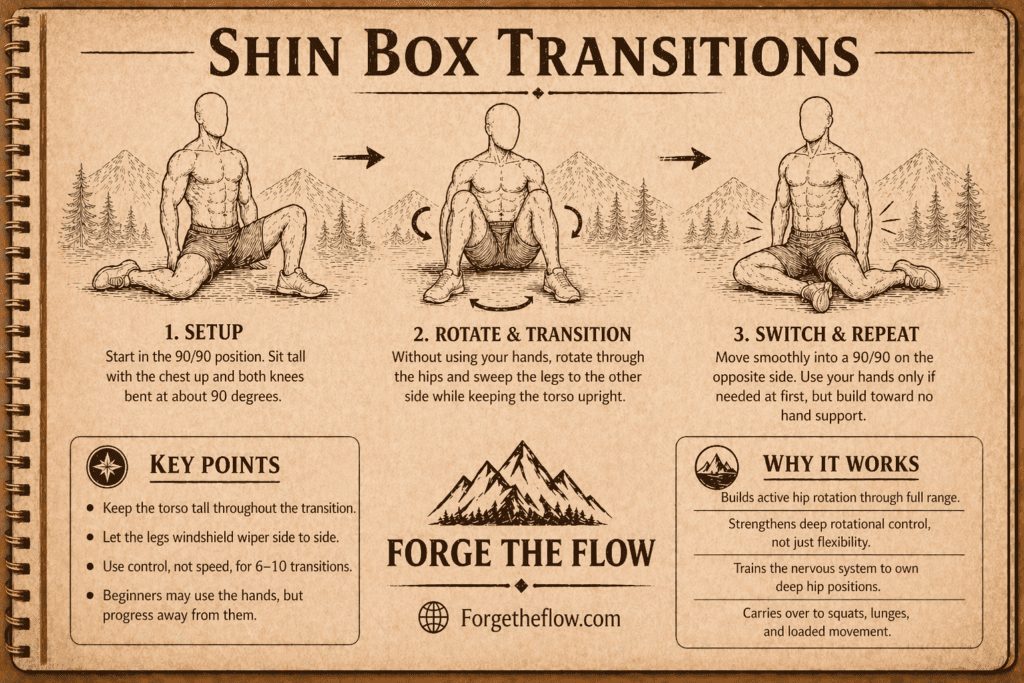
Start in the 90/90 position. Without using your hands, rotate your hips and transition to a 90/90 on the opposite side. Your legs windshield wiper from one configuration to the other while you maintain an upright torso.
This is difficult at first. Most people need to use their hands to assist the transition. That’s fine initially, but the goal is smooth, controlled transitions without hand support. Work sets of 6 to 10 transitions, focusing on control rather than speed.
Shinbox transitions build active hip rotation in a way that static stretching never will. You’re strengthening through the full rotational range while teaching your nervous system to trust deep hip positions under movement. This translates directly into better movement quality during loaded squats, lunges, and carries.
Essential Knee Mobility Exercises
Knee health depends on controlled flexion, full extension, and proper tracking through movement. These exercises address the most common restrictions while building resilient, pain-free knees that handle heavy loading and high volume.
ATG Split Squat Progression
Start in a split squat stance with your back foot elevated on a low step or plates. Lower yourself under control, allowing your back knee to bend deeply and track straight down toward the ground. Your front shin will angle forward as your knee travels past your toes. This is correct. Pause at the bottom, then drive through your front foot to return to the start.
Technical points:
- Keep your torso upright throughout the movement
- Allow your front knee to travel forward naturally without restriction
- Control the descent slowly, taking 3 to 4 seconds to reach the bottom
- Your back knee should bend to at least 90 degrees, ideally deeper
Work 3 sets of 6 to 10 reps per leg with bodyweight only until you own the pattern. The deep knee flexion under control builds strength and confidence in ranges most people avoid. This is one of the most effective exercises for bulletproofing knees against injury while expanding functional range.
Many people have been told that knees shouldn’t travel past toes. This is outdated advice that limits your movement potential. Your knee is designed to flex deeply with forward translation. Training this pattern makes your knees more resilient, not more fragile.
Why it works: The ATG (ass-to-grass) split squat builds controlled knee flexion strength through the deepest ranges your knee can access. This movement trains both knees simultaneously. Your front knee works through deep flexion with forward translation, while your back knee builds flexion strength and control in the bottom position. The elevated back foot creates more range and challenge than a standard split squat. This progression develops the eccentric strength and positional confidence that protects knees from injury during sports, training, and daily life. Over time, this exercise dramatically improves your ability to control deep knee bend under load, which translates directly into better squat depth, more powerful jumping and landing mechanics, and healthier knee joints that can handle high demands without breaking down.
Tibialis Raises
Stand with your heels elevated on a plate or step, toes on the ground. Raise your toes toward your shins as high as possible, contracting the muscles on the front of your lower leg. Lower under control and repeat for 15 to 25 reps.
This targets the tibialis anterior, the muscle that runs across the front of the shin and controls dorsiflexion while playing a crucial role in knee health and injury prevention. Weak tibialis muscles contribute to shin splints, poor landing mechanics, and knee pain during running or jumping.
Most training completely neglects this muscle group. Adding tibialis raises addresses a common weak link that improves ankle mobility, knee tracking, and overall lower leg durability. Work these 3 to 4 times per week for best results.
Wall Ankle Mobilization
Face a wall in a staggered stance with one foot forward. Keep your forward heel down and drive your knee toward the wall, trying to touch it without your heel lifting. You’ll feel a stretch through your Achilles and calf.
Once you can touch the wall easily, move your foot farther back and repeat. Track how far from the wall you can get while maintaining heel contact. This is a measurable test of ankle dorsiflexion that directly impacts knee health.
Why this matters for knees: Limited ankle dorsiflexion forces compensation at the knee. Your knee has to travel inward or your heel lifts, both of which create poor loading patterns and increase injury risk. Improving ankle mobility cleans up knee mechanics automatically.
Work 2 to 3 sets of 10 to 12 controlled pulses per side, holding the end position for 2 seconds on each rep. Focus on keeping your arch engaged and your heel firmly planted throughout.
Seated Knee Flexion Stretch
Sit on the ground with one leg extended straight and the other bent with your foot pulled close to your glutes. Gently sit back toward the bent leg’s heel, increasing knee flexion while keeping your knee tracking straight.
Hold this position for 60 to 90 seconds, allowing the tissues around the knee to relax and lengthen. You can increase intensity by sitting taller or pulling your heel closer to your glutes.
This stretch targets knee flexion specifically, which many people lose over time. Full knee flexion is essential for deep squatting, proper running mechanics, and getting up and down from the ground efficiently. The inability to fully flex your knee limits athletic performance across the board.
Knee Circles (CARs for the Knee)
Stand on one leg and lift the other knee to hip height. Slowly rotate your lower leg in controlled circles, exploring the full range your knee allows. To do this, point your toe as far to the right or left as you can, then move the lower leg so that your foot makes a controlled circle, pointing your toe from right to left (or left to right) in a windshield wiper movement along the way. After completing a circle, revers the movements made by the lower leg and toes. Move equally in both directions, maintaining balance and control throughout.
Controlled Articular Rotations build joint health by moving through maximum available range under neuromuscular control. This teaches your nervous system that these ranges are safe while promoting synovial fluid circulation.
Work 5 to 8 slow, deliberate circles in each direction per leg. The slower and more controlled, the better. This is assessment and training combined. The quality of your circles reveals restrictions and asymmetries while simultaneously addressing them.
Integrated Hip and Knee Mobility Routine
This standalone routine hits all major ranges and restrictions in 15 to 20 minutes. Use it as a dedicated mobility session on rest days or light training days. Perform each movement with focus and control, breathing deeply throughout.
- Deep Squat Hold – 90 seconds, using elbows to open hips
- 90/90 Hip Stretch – 60 seconds per side, focus on sitting tall
- Hip Flexor Stretch with Posterior Tilt – 45 seconds per side, maintain glute contraction
- Shinbox Transitions – 8 to 10 smooth transitions, minimal hand support
- Cossack Squat – 6 reps per side, slow and controlled
- Wall Ankle Mobilization – 12 pulses per side, 2-second holds
- Tibialis Raises – 20 reps, full range and contraction
- Seated Knee Flexion Stretch – 60 seconds per side
- ATG Split Squat Progression – 8 reps per side, 3-second descents
- Knee Circles – 5 circles each direction per leg
Run through this sequence 3 to 4 times per week for noticeable improvements in range and control within two weeks. Within a month, movements that felt restricted will open up significantly. After three months of consistent work, you’ll own ranges you haven’t accessed since your early twenties.
The order matters. Start with static holds that open up major restrictions, move into dynamic stretches that build active range, then finish with strength-based movements that lock in the new ranges under load. This progression primes your nervous system to accept and integrate the mobility you’re building.
How to Program Mobility Into Your Training Week
Mobility work fits into your schedule in three distinct ways: as a warm-up component, as standalone sessions, and integrated into strength training.
Before strength or conditioning sessions: Use a condensed 5 to 8 minute mobility warm-up targeting the specific joints you’re about to load. If you’re squatting, hit deep squat holds, Cossack squats, and ankle mobilizations. If you’re doing kettlebell swings and Turkish get-ups, prioritize hip flexor stretches, 90/90 stretches, and shinbox transitions. And so on, based on the other movements that you will go through in your workout, activity, or sport. This prepares the joints for loaded work while improving movement quality during the session itself.
Keep pre-training mobility dynamic and focused. You’re not trying to make any additional range gains during this period. You’re simply warming up the specific patterns and ranges your training session requires – getting the tissues warm and moving and waking up your nervous system so yoru joints can run at full capacity with peak performance while also protecting themselves. Save the longer holds and deeper work for dedicated sessions.
As standalone mobility sessions: Schedule the full 15 to 20 minute routine on rest days or light training days. Treat these sessions seriously, doing each movement with intention and an eye on mobility gains. They’re not filler. They’re active recovery that enhances your training capacity. The recovery you gain from improved tissue quality and joint health pays dividends in your next hard session.
Two to three dedicated mobility sessions per week, spaced evenly, produce excellent results without cutting into training time. Monday, Wednesday, Friday works well for most schedules. Or pair mobility work with low-intensity activities like walking or easy rucking.
Integrated into strength training: Use mobility exercises as active rest between strength sets. While recovering from heavy squats, perform a set of Cossack squats or a 90-second deep squat hold. Between kettlebell sets, hit hip flexor stretches or shinbox transitions. This extends your session slightly but eliminates the need for separate mobility work.
The key is matching the mobility work to the training. If you’re doing upper body work, integrate lower body mobility during rest periods. If you’re training legs, use upper body mobility or breathwork between sets. This approach works well for time-crunched training schedules and keeps training sessions feeling productive throughout.
Daily micro-sessions deliver results too. Five minutes first thing in the morning focusing on hip and knee mobility accumulates to 35 minutes weekly. That’s enough stimulus to drive adaptation without requiring dedicated training slots. Some people respond better to frequent short sessions than less frequent longer ones. Experiment to find what your body responds to best.
Avoid mobility work immediately before maximum effort lifts or explosive training. Deep stretching temporarily reduces power output and neuromuscular efficiency. If you’re testing a one-rep max or doing sprint work, keep the warm-up dynamic and range-specific without extended static holds. Save the deep mobility work for after the session or later in the day.
Common Mistakes That Limit Mobility Progress
Most people sabotage their mobility gains without realizing it. These errors are common, fixable, and worth avoiding if you want results that stick.
Pushing through pain instead of working with tension. Mobility work should create a strong stretch sensation, not sharp pain. If you feel pinching, stabbing, or joint pain, you’re either forcing range your body isn’t ready for or compensating poorly. Back off, adjust your position, and find a range where you feel productive tension without pain signals. Pain is your nervous system telling you to stop. Tension is your tissues adapting. Know and respect the difference between the two.
Inconsistent practice that never builds momentum. Mobility requires frequency to create lasting change. Doing an hour-long mobility session once every two weeks accomplishes almost nothing. Your nervous system and tissues need regular input to adapt. Ten minutes four times per week beats sixty minutes once per week every time.
Holding stretches without breathing properly. Shallow breathing keeps your nervous system in a protective state that limits range. Deep, slow breathing through your diaphragm signals safety to your nervous system and allows tissues to relax. Inhale for four counts, exhale for six counts. This breathing pattern activates your parasympathetic system and enhances the effectiveness of every stretch.
Ignoring asymmetries between sides. Most people have significant differences in hip and knee mobility between their left and right sides. Treating both sides the same allows these gaps to persist. Spend extra time on your tighter, weaker side. If your right hip needs 90 seconds and your left needs 60 to acheive balance, adjust accordingly. Balanced mobility between sides improves movement quality and reduces compensation patterns.
Skipping end-range strengthening. Flexibility without strength creates unstable joints that your nervous system won’t trust. After stretching into new ranges, you need to strengthen those ranges through lightly loaded movement at the end ranges. This is why exercises like the ATG split squat and Cossack squat are so valuable. They build strength at the exact ranges where most people only stretch.
Expecting immediate results and quitting too early. Meaningful mobility improvements take weeks, not days. You might feel better after a single session, but structural changes in tissue length and neuromuscular patterning require consistent work over time. Most people quit right before the real adaptations start showing up. Commit to six weeks minimum before judging whether the program works.
Troubleshooting Specific Mobility Limitations
When progress stalls or certain movements remain difficult despite consistent work, these targeted strategies help break through plateaus.
If your hips won’t open in the deep squat:
Your limitation is likely ankle dorsiflexion, hip flexion, or both. Test this by elevating your heels on plates. If your squat depth improves dramatically with heel elevation, your ankles are the bottleneck. Double down on wall ankle mobilizations and tibialis raises. If heel elevation doesn’t help much, your hips need more work. Add extra sets of 90/90 stretches and deep squat holds daily.
Another common cause is poor motor control through the pattern. You might have the passive range but lack the coordination to access it under load. Practice box squats to a low target, pausing at the bottom and standing without momentum. This builds confidence and control in deep positions.
If one hip is significantly tighter than the other:
This usually traces back to old injuries, sport-specific demands, or daily habits like always carrying weight on one side. Spend double the time on your tighter side during mobility sessions. Add unilateral work like single-leg hip flexor stretches and single-leg deep squat holds. Identify what you do differently on each side in daily life and address those patterns.
Check your squat and lunge mechanics under light load. Film yourself from the front and back. Asymmetries in mobility create visible compensation patterns. You’ll likely see one knee caving in more, one hip shifting laterally, or uneven depth between sides. Awareness of these patterns helps you correct them consciously during training.
If your knees hurt during mobility work:
First, distinguish between productive discomfort and pain that signals damage. Sharp pain, swelling, or pain that worsens with movement requires professional evaluation, so speak to your doctor before proceeding with anything. Dull achiness or stretching sensations that improve with movement are usually safe to work through gradually.
Check your tracking (the path your knee travels in relation to the position of your foot). Your knee should move in line with your foot throughout all movements. If your knee caves inward during squats or lunges, you’re loading the joint poorly. This often stems from weak glutes or tight adductors. Add glute activation work and extra adductor stretching through Cossack squats.
Reduce range temporarily. Work within pain-free ranges and gradually expand them as strength and control improve. Partial range work with perfect mechanics and an eye on extending the range in the future beats full range work with compensation and pain.
If you’re flexible but lack strength in deep ranges:
Your nervous system doesn’t trust the ranges you can access. This is common in people with naturally high flexibility or those who stretch extensively without strength work. You need to build strength and control at end ranges.
Add tempo work to your mobility exercises. Perform Cossack squats and ATG split squats with slow eccentrics (4 to 5 seconds down) and pauses at the bottom (2 to 3 seconds). This builds time under tension in the exact positions where you lack control.
Incorporate loaded stretches. Hold a light kettlebell in the goblet position during deep squat holds, and move into and out of the end of the ranges while lightly loaded with weight. This adds resistance that forces your muscles to engage while accessing deep ranges. The combination of load and depth creates the neuromuscular control that makes flexible joints functional.
Mobility for Specific Training Styles and Movements
Different training emphases create different mobility demands. Tailoring your approach to match your primary training style ensures you’re addressing the specific ranges and patterns your performance depends on.
For kettlebell training:
Your hips are everything. Swings, snatches, cleans, and Turkish get-ups all demand exceptional hip mobility combined with explosive power. Prioritize hip flexor stretches and hip extension range. Tight hip flexors kill your hip snap during swings and limit overhead stability during get-ups.
Add extra 90/90 work and shinbox transitions to build rotational hip strength. The get-up requires smooth hip rotation through multiple positions. Training that range specifically improves technical execution and reduces grinding through the movement.
Work on loaded hip mobility by holding a light kettlebell in positions that challenge your range. Goblet squat holds and single-arm overhead holds in a half-kneeling position combine mobility and stability beautifully.
For calisthenics and gymnastics:
You need extreme ranges combined with high levels of strength at those ranges. Deep squat mobility supports pistol squats and deep lunge positions. Hip flexion and extension range enables L-sits, front levers, and back levers. Knee flexion depth affects your ability to perform proper shrimp squats and advanced single-leg variations.
Spend significant time in passive stretches at end ranges, then immediately follow with active strength work in those positions. Stretch your hip flexors, then immediately perform hanging leg raises to full hip flexion. Stretch into a deep squat, then perform pause squats at maximum depth.
Prioritize wrist, shoulder, and thoracic mobility alongside hip and knee work. Calisthenics demands full-body mobility in ways that barbell training doesn’t. An integrated approach prevents weak links.
For rucking and long-distance work:
Hip extension and ankle dorsiflexion are critical. Every step requires these ranges, and restrictions create compensations that accumulate over miles. Limited hip extension forces you to overextend your lumbar spine with each stride. Limited dorsiflexion overworks your calves and Achilles.
Focus on hip flexor stretches with posterior pelvic tilt and wall ankle mobilizations. Perform these both before and after long rucks to maintain quality mechanics throughout the session and promote recovery afterward.
Add Copenhagen planks (side-plank variation designed to strengthen the hip adductors, the inner thighs, and core ) and side-lying hip abduction work to strengthen your hip stabilizers. Rucking in unstable terrain demands lateral hip stability that many people lack. Mobility without stability creates injury risk during long efforts.
For HIIT and metabolic conditioning:
You’re moving through large ranges at high speeds under fatigue. This demands mobility combined with resilience. Focus on building margin in your ranges. If your workout requires squatting to parallel, you should own depth well below parallel when fresh. This buffer prevents form breakdown as fatigue sets in.
Warm-up quality matters tremendously. Spend 8 to 10 minutes on dynamic mobility before high-intensity sessions. Include deep squat holds, dynamic hip openers like leg swings, and ankle mobilizations. This primes movement quality before you ask your body to perform at high outputs.
Cool down with longer static holds targeting the ranges you just worked. After a high-volume squat session, spend time in deep squat holds and hip flexor stretches. This promotes recovery and maintains range despite the tissue stress from high-rep training.
Measuring Progress and Setting Benchmarks
Tracking your mobility improvements keeps you motivated and reveals what’s working. These simple tests provide objective feedback on hip and knee function.
Deep squat assessment:
Can you sit in a full-depth squat with heels down, knees tracking over toes, and torso upright for two minutes without discomfort? This is a fundamental human position that reveals overall lower body mobility. Film yourself from the side and front. Look for heel lifting, excessive forward lean, knees caving inward, or inability to maintain depth.
Retest monthly. Track how your position quality improves and how long you can hold it comfortably. Most people see dramatic improvements in the first month, then steady progress afterward.
Hip rotation screen:
Lie on your back with hips and knees bent to 90 degrees, feet off the ground. Keeping your thighs vertical, rotate your lower legs outward (testing internal hip rotation) and inward (testing external rotation). Your range should be symmetrical between sides and allow at least 45 degrees of rotation in each direction.
Limited internal rotation shows up as difficulty rotating your lower legs outward. Limited external rotation prevents your legs from rotating inward. Most people lack internal rotation significantly more than external. This asymmetry contributes to squat and deadlift compensation patterns.
Knee flexion test:
Sit on the ground and pull one heel toward your glutes, trying to touch your heel to your butt. Can you do this without pain and without your knee tracking to either side? Your heel should come within a few inches of your glutes if you have healthy knee flexion.
If there’s a significant gap, you need more knee flexion work. If one side differs notably from the other, that asymmetry needs attention. Retest every two weeks as you work through the seated knee flexion stretches and ATG split squat progressions.
Ankle dorsiflexion measurement:
Measure the distance from your toes to the wall when performing the wall ankle mobilization. Healthy ankle dorsiflexion allows you to touch the wall with your knee while your foot is roughly 4 to 5 inches away. Less than 3 inches indicates limited range that will affect squat depth and knee health.
Track this number monthly. Most people gain an inch or more in the first six weeks of consistent ankle mobility work. This objective measurement clearly shows progress even when subjective feel is less obvious.
Before and after comparisons matter most. Film yourself performing a bodyweight squat, lunge, and single-leg balance at the start of your mobility program. Repeat the same tests every four weeks. The visual difference in depth, control, and movement quality provides undeniable evidence of progress.
Numbers and measurements are useful, but how you feel during training tells the real story. Can you squat deeper with better control? Do your hips feel more open during kettlebell swings? Does your lower back feel less irritated after hard training sessions? These subjective improvements matter more than any test score.
Advanced Mobility Techniques for Experienced Athletes
Once you’ve mastered the fundamental movements, these advanced methods accelerate progress and break through stubborn restrictions.
Loaded stretching for strength and range:
Hold light to moderate loads in stretched positions to build active flexibility. Examples include goblet squat holds at maximum depth, overhead holds in a deep lunge, or single-leg Romanian deadlifts held at the bottom position. The load forces muscular engagement while the position creates stretch. This combination builds usable range faster than passive stretching alone.
Start with loads around 25 to 30 percent of what you’d use for strength work. Hold for 20 to 45 seconds, focusing on breathing and maintaining perfect position. Work up to heavier loads as your tolerance improves. This technique is especially effective for hip and shoulder mobility.
Proprioceptive Neuromuscular Facilitation (PNF) stretching:
This involves contracting the muscle you’re stretching immediately before deepening the stretch. For example, during a hip flexor stretch, contract your hip flexor against resistance for 5 to 10 seconds, then relax and sink deeper into the stretch. The contraction fatigues the muscle temporarily, allowing a deeper stretch through a neurological mechanism called autogenic inhibition.
PNF is intense and produces rapid results but shouldn’t be used daily. Two to three times per week on your tightest restrictions works well. Use it strategically on areas that aren’t responding to standard stretching methods.
Isometric holds at end range:
Move into the deepest range you can control, then hold that position under tension for 30 to 60 seconds. This is different from passive stretching. You’re actively contracting muscles to maintain the position rather than relaxing into it. The ATG split squat at bottom position is a perfect example. So is holding the bottom of a Cossack squat under tension.
These holds build both mobility and stability simultaneously. Your nervous system learns that deep ranges are safe because you’re demonstrating strength there. Work them into your training 2 to 3 times weekly, using them as finishers after strength work or during dedicated mobility sessions.
Controlled Articular Rotations (CARs) under resistance:
Perform your knee circles or hip circles with a resistance band creating tension throughout the movement. This forces greater muscular control while exploring maximum joint range. The resistance provides feedback that helps you identify exactly where your range diminishes or control falters.
Use light resistance initially. The goal is controlled, smooth movement through the largest possible range, not fighting heavy resistance. Perform 3 to 5 perfect circles in each direction, focusing intensely on quality. This is advanced joint training that builds remarkable hip and knee health when performed consistently.
Nutrition and Recovery Factors for Mobility
Joint health and tissue quality don’t exist in a vacuum. What you eat and how you recover directly impact your mobility progress.
Hydration affects tissue pliability. Fascia, tendons, and ligaments all require adequate water content to maintain elasticity and slide properly over one another. Chronic dehydration creates stiff, inflexible tissues that resist stretching. Aim for half your body weight in ounces of water daily as a baseline. More if you’re training hard or in hot conditions.
Collagen and protein intake support connective tissue health. Your tendons, ligaments, and joint capsules are made largely of collagen. Consuming collagen peptides or gelatin alongside vitamin C before mobility training provides the raw materials your body uses to repair and strengthen these tissues. Twenty grams of collagen with 50 to 100mg of vitamin C taken 30 to 60 minutes before training optimizes collagen synthesis.
Omega-3 fatty acids reduce systemic inflammation that contributes to joint stiffness. Fish oil, fatty fish like salmon and sardines, or algae-based omega-3 supplements help maintain healthy inflammatory responses. This doesn’t replace mobility work, but it creates an internal environment where joints can move more freely.
Sleep quality determines how well your nervous system integrates mobility gains. The adaptations you’re seeking happen during recovery, not during the training session itself. Poor sleep disrupts the neurological adaptations that expand your movement envelope. Prioritize 7 to 9 hours of quality sleep consistently. Your mobility progress will accelerate.
Stress management matters more than most people realize. Chronic stress keeps your nervous system in a sympathetic state that restricts range and increases muscle tension. Practices like breathwork, meditation, or simply spending time outdoors reduce stress and allow your body to relax into deeper ranges. Five minutes of box breathing before mobility work noticeably improves the quality of the session.
Don’t neglect soft tissue work. Foam rolling, lacrosse ball massage, and other myofascial release techniques complement stretching by addressing tissue quality directly. Spend time on your hip flexors, IT bands, adductors, and calves regularly. This isn’t a replacement for mobility training, but it enhances the effectiveness of the work you’re doing.
Long-Term Mobility Maintenance
Building mobility is one thing; keeping it is another. Most people hit their goals, back off the work, and lose the range within weeks. Smart maintenance prevents this regression without requiring the same time investment as the building phase.
Once you’ve achieved your mobility goals, maintenance requires roughly 40 to 50 percent of the volume that built the range initially. If you were doing four dedicated mobility sessions weekly to make gains, two sessions weekly maintains those gains indefinitely.
Integrate maintenance work into your existing training. Use mobility exercises as warm-ups, active rest between sets, and cool-downs. This keeps the work frequent without adding separate sessions. A few minutes of hip and knee mobility before squatting and after training maintains range without feeling like additional work.
Continue testing your ranges monthly. This catches small regressions before they become significant. If you notice depth or control declining, temporarily increase your mobility volume for two to three weeks to bring it back up.
Life circumstances change, and sometimes mobility work gets deprioritized. Travel, busy work periods, or injury recovery can interrupt your routine. When this happens, don’t treat it as failure. Return to your baseline mobility routine as soon as possible and rebuild. You’ll regain lost range faster than you initially built it thanks to muscle memory and neurological adaptations that persist.
Mobility is a long game that pays dividends across your entire training career. The hip and knee range you build now protects you from injury, enhances your performance, and allows you to train hard into your 40s, 50s, and beyond. Athletes who prioritize mobility alongside strength stay in the game longer and perform better throughout their lives.
Building exceptional hip and knee mobility changes how your body moves under load, how you feel during and after training, and how long you can sustain high performance. The exercises and programming in this guide give you everything you need to build joints that support your training instead of limiting it.
Consistency matters more than perfection. Start with the basic routine, commit to it for six weeks, and watch how your movement quality transforms. The deep ranges you build won’t just make you more mobile. They’ll make you stronger, more powerful, and far more resilient across every domain of training.


ABOUT THE AUTHOR
Carlos Grider is a former U.S. Marine, CrossFit Level 1 trainer, certified personal trainer, and the creator of Forge the Flow. After nearly a decade supporting combat operations and special operations in austere environments — and another decade traveling across 65+ countries as a nomad and adventure athlete — Carlos distilled everything he learned about staying strong, capable, and resilient without a gym into the Forge the Flow training system. He has trekked solo to Everest Base Camp, surfed Bali through the pandemic, trained Muay Thai in Thailand, and run self-guided marathons across four continents — all maintained on minimalist training built for real life. He writes about the fitness methods that actually travel.
Click here to learn more about Carlos's story.