
Your arms don’t need a gym membership to get strong, sturdy, and become the arms of a physique most men desire.

Most people assume building muscular and strong arms requires a rack of dumbbells and cable machines, but gymnastics and calisthenics prove otherwise when you understand progression mechanics. Additionally, bodyweight training builds arms that perform under real-world demands, not just controlled weight room movements. The difference lies in how you manipulate leverage, tempo, and grip positions to create the resistance you ned for arm gains.
This guide breaks down 25 calisthenics arm exercises across biceps, triceps, and forearm muscle groups, complete with progression paths, volume recommendations, and strategies to overcome the limitations bodyweight training presents compared to traditional resistance work.

Table of Contents
Biceps Exercises
Building biceps without weights requires understanding how body positioning changes resistance. Most calisthenics programs underserve bicep work because pulling movements default to moes that distribute load across back muscles. Instead, specific modifications are needed to isolate the arms when executed correctly. While these changes are seemingly small, they add up to big results for your biceps. These exercises progress from foundational patterns to advanced variations that challenge even seasoned lifters.
1. Chin-Ups (Underhand Grip)
Chin-ups deliver more direct bicep stimulation than any other bodyweight pulling movement because the supinated grip forces elbow flexion through the full range of motion.

Critical positioning detail: Your biceps work hardest when you eliminate momentum and maintain a dead hang between reps, forcing the arms to initiate each pull without assistance from swing or kip.
The underhand grip shifts load distribution compared to standard pull-ups, which use an overhand grip instead. Where overhand grips emphasize lats and upper back, the supinated position of chin-ups creates a biomechanical advantage for bicep engagement while still recruiting supporting muscle groups. This dual benefit makes chin-ups the foundation of bodyweight arm training. Most people rush through the eccentric phase (the “lowering” portion of the exercise wherein the biceps lengthen while still under tension, acting as a brake against gravity and resistance), but the lowering portion builds as much strength as the pull itself when controlled for a three-second descent.
Progression path:
- Beginner: Resistance band-assisted chin-ups or slow eccentrics, also referred to as “negatives” (jump up into the top of a chin up and lower slowly)
- Intermediate: Full chin-ups with 2-second pause at top
- Advanced: Weighted chin-ups using a backpack with books or water bottles
- Elite: One-arm chin-up progressions starting with archer chin-ups
Muscle focus: Standard chin-ups hit the entire bicep with slight emphasis on the long head due to shoulder extension. Bringing your chest to the bar increases peak contraction.
For strength, perform 3-5 sets of 3-5 reps with maximum control. For hypertrophy, aim for 4-6 sets of 6-10 reps with a 3-1-1 tempo (three seconds down, one second pause, one second up). Train chin-ups 2-3 times per week with at least 48 hours between sessions to allow for complete recovery and adaptation.
2. Inverted Rows with Supinated Grip
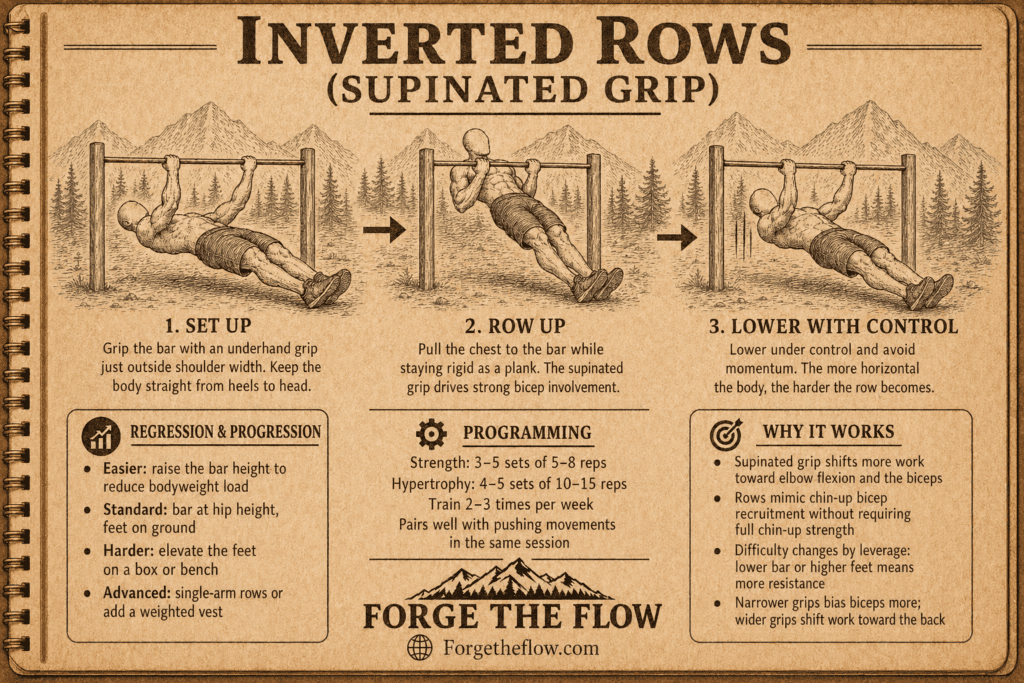
Most lifters think rows only build backs, but grip position determines which muscles dominate the movement pattern.
The leverage shift matters: As you lower the bar height or elevate your feet, resistance increases exponentially because more of your bodyweight moves along the pulling vector.
Inverted rows done, hanging from a bar with your body just above parallel to the ground, back straight, and with an underhand grip create similar bicep recruitment to chin-ups but remove the barrier of needing full chin-up strength. You control difficulty by adjusting body angle rather than adding external weight. Set up under a bar, table edge, or TRX straps at hip height. The more horizontal your body, the harder the exercise becomes. Pull your chest to the bar while keeping your body rigid as a plank from heels to head. The supinated grip naturally engages biceps through the entire pulling motion, especially during the final third of the range when your hands approach your ribcage.
Regression and progression options:
- Easier: Raise bar height to reduce the percentage of bodyweight being pulled
- Standard: Bar at hip height, feet on ground
- Harder: Feet elevated on box or bench
- Advanced: Single-arm inverted rows or add weighted vest
Position your hands just outside shoulder width. Narrower grips increase bicep emphasis but reduce range of motion. Wider grips shift work to your back. The sweet spot sits about 1-2 inches outside your shoulders.
Volume recommendations: Strength work calls for 3-5 sets of 5-8 reps, while hypertrophy responds better to 4-5 sets of 10-15 reps. These can be trained 2-3 times weekly and pair well with pushing movements in the same session.
3. Resistance Band Bicep Curls
Pure isolation exists in calisthenics when you add one simple tool that weighs nearly nothing and fits in a pocket. Resistance bands.
Band tension creates unique resistance: Unlike weights that provide constant load, bands increase tension as they stretch, creating peak resistance exactly where your biceps are strongest – at full contraction.
Strict calisthenics purists might object to bands, but they solve the isolation problem bodyweight training faces.
To do the movement, stand on the center of a resistance band with feet hip-width apart. Grip the ends with an underhand grip, arms fully extended. Curl both hands toward your shoulders while keeping your elbows pinned to your sides. The movement isolates biceps without requiring pulling your entire bodyweight. Band resistance accommodates strength curves better than free weights because tension peaks when muscles are fully shortened, matching natural strength output through the range of motion.
How to adjust difficulty:
Decrease resistance: Use lighter band, stand on band with narrow stance (lengthens band for more stretch), or perform single-arm curls alternating sides
Increase resistance: Use thicker band, double up bands, add pauses at peak contraction, stand with wider stance on the bands (shortens band length)
Targeting specific areas: Standard curls emphasize the middle bicep. Hammer curls (neutral grip) shift work to the brachialis and brachioradialis, creating thickness. Wide curls (start with hands wide, curl inward) target the short head for peak development.
Sets and frequency follow typical isolation work. For strength, 3-4 sets of 8-12 reps work well. Hypertrophy responds to 4-5 sets of 12-20 reps with controlled tempo and peak squeeze. Train these 2-3 times per week either as a finisher after compound pulling work or on separate days.
4. Pelican Curls
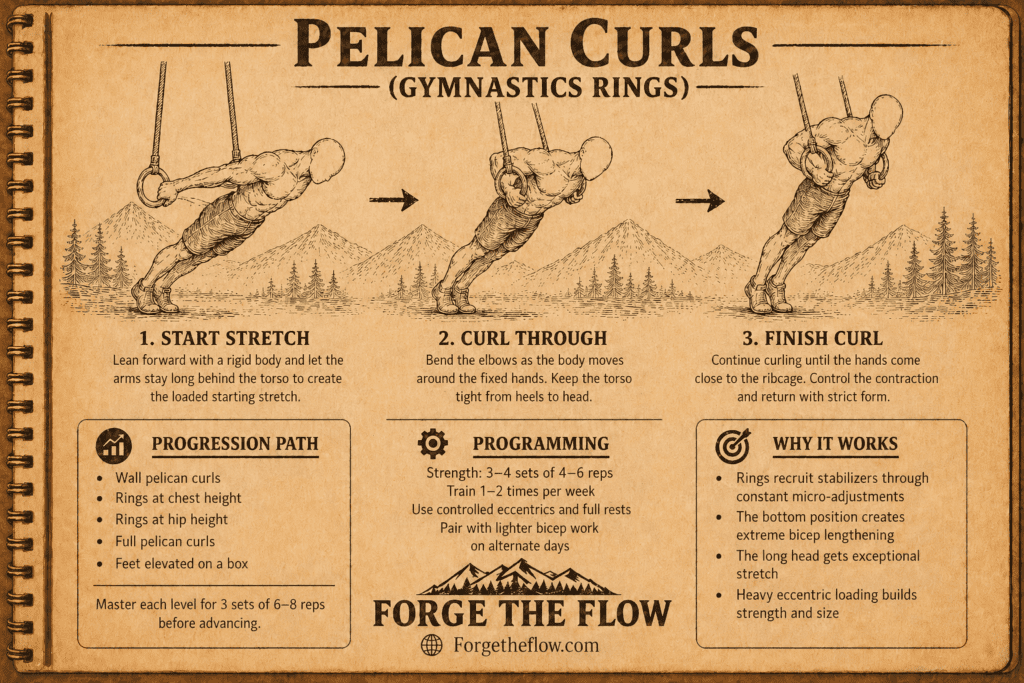
The most underrated bodyweight bicep exercise exists in gymnastics rings, and almost nobody does it correctly.
Rings unlock movement freedom: The instability of rings forces constant micro-adjustments that recruit stabilizer muscles while the exercise itself targets biceps through an extended range most exercises miss.
Pelican curls require gymnastics rings or TRX straps.
To do the movement, start in a push-up support position on rings with arms fully extended. Keeping your body rigid, lean forward while bending your elbows, allowing your body to move forward as your hands track toward your head. The movement resembles a reverse bicep curl where your body moves around fixed hands instead of moving weights with fixed body position.
This exercise hammers the biceps through extreme lengthening at the bottom position, creating significant stimulus for strength and size. The long head of the biceps gets exceptional stretch in the bottom position.
Progression structure:
- Wall pelican curls: Perform against a wall at an angle to reduce load
- Rings at chest height: More upright body angle decreases difficulty
- Rings at hip height: Increased body lean creates more resistance
- Full pelican curls: Rings low, body nearly horizontal
- Elevated feet: Feet on box shifts more weight forward
Each progression level should be mastered for 3 sets of 6-8 controlled reps before advancing. This builds the connective tissue resilience needed to handle the stress this movement creates.
These are strength-focused movements. Perform 3-4 sets of 4-6 reps, training them 1-2 times per week. The eccentric loading is substantial, so recovery takes longer than standard curls. Pair with lighter bicep work on alternate days rather than stacking heavy bicep exercises in single sessions.
5. Bodyweight Bicep Curls (Door Frame Method)
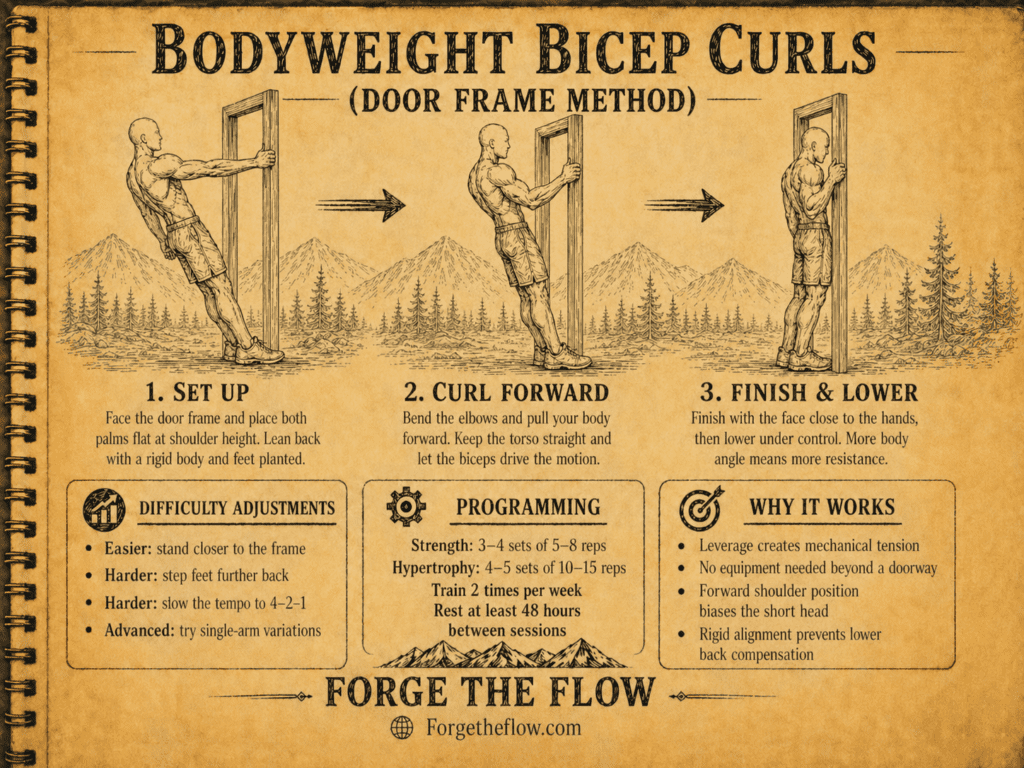
You can curl your bodyweight using nothing but a door frame and proper body positioning.
Mechanical tension determines growth: This exercise proves that creative leverage manipulation creates training stimulus equivalent to external weights when positioning is precise.
Stand in a doorway facing the frame. Place both palms against each side of one side of the door frame at shoulder height with arms extended, fingers pointing up. Lean back, keeping your body straight and feet planted firmly. Now pull yourself forward by bending your elbows, bringing your face toward your hands. Your biceps work against your bodyweight as resistance. The further you position your feet from the door frame, the more horizontal your body becomes and the harder the exercise gets. This movement allows for pure bicep curling motion without equipment.
Difficulty adjustments:
Make it easier: Stand closer to the door frame so your body is more vertical, reducing the percentage of bodyweight your arms must curl.
Make it harder: Step feet further back, past the door frame, to increase body angle, slow the tempo to 4-2-1 (four seconds eccentric, two second pause, one second concentric), or perform single-arm variations.
The short head of the bicep receives slightly more emphasis due to the forward shoulder position during this exercise. Maintain rigid body alignment from head to heels throughout the movement to prevent lower back compensation.
Training parameters: For strength development, perform 3-4 sets of 5-8 reps with maximal body angle you can control. Hypertrophy work calls for 4-5 sets of 10-15 reps at a moderate angle. Train 2 times per week, allowing at least 48 hours between sessions for recovery.
Triceps Development
Triceps make up two-thirds of your arm mass, and calisthenics provides more effective tricep training options than bicep work because pushing movements naturally isolate these muscles. The key lies in understanding how hand position, body angle, and elbow tracking change which tricep head receives emphasis. These exercises range from accessible variations anyone can perform to advanced movements that challenge elite athletes.
6. Close-Grip Push-Ups (Diamond Push-Ups)
Moving your hands inward transforms the basic push-up from a chest heavy exercise into a targeted tricep builder that research shows activates triceps more than standard width push-ups.
Hand position dictates muscle recruitment: Every inch you move your hands closer together shifts load from chest to triceps, with the diamond position creating maximum tricep engagement while maintaining safe joint alignment.
Set up in a push-up position but place your hands directly under your chest with thumbs and index fingers touching to form a diamond shape. Lower your body until your chest nearly touches your hands, then press back up. Keep elbows tucked close to your sides rather than flaring outward, to maintain healthy elbow and shoulder movement. This positioning forces your triceps to handle the majority of the pressing work. The lateral head of the triceps receives the most stimulation in this variation, contributing to the “horseshoe” appearance from behind. Elbow position matters critically in this movement. Flaring elbows outward reduces tricep engagement and increases shoulder stress.
Progression pathway:
- Beginner: Perform on knees or with hands elevated on a bench
- Intermediate: Standard diamond push-ups from the floor
- Advanced: Feet elevated on box or bench
- Elite: Weighted vest diamond push-ups
Common mistake warning: Most people position their hands too far forward. Your hands should be directly beneath your sternum, not out in front of your shoulders. This ensures optimal tricep loading and reduces wrist strain.
For strength goals, complete 3-5 sets of 5-8 reps with a controlled tempo. Hypertrophy responds to 4-6 sets of 10-15 reps. These can be trained 2-3 times weekly and work well as part of a push-focused training day.
7. Bench Dips
This exercise gets dismissed as a beginner movement, but advanced variations rival any weighted tricep exercise for building tricep size and strength.
Body position changes everything: The further your feet extend from the bench, the greater the percentage of bodyweight your triceps must press, turning a simple exercise into a legitimate mass builder.
To do the movement, sit on the edge of a bench or sturdy chair. Place your hands on the edge next to your hips, fingers pointing forward. Slide your hips off the edge and extend your legs out in front of you. Lower your body by bending your elbows to 90 degrees, then press back up to the starting position. Keep your back close to the bench throughout the movement. Your elbows should track straight backward, not flare to the sides. The long head of the triceps gets significant stretch at the bottom position due to the shoulder extension, making this excellent for overall tricep development.
How to scale difficulty:
Easier: Bend knees to 90 degrees with feet flat on floor, reducing load.
Standard: Legs extended straight with heels on ground.
Harder: Elevate feet on a second bench or box at same height as hands.
Advanced: Add weight plates on your lap or use a loaded backpack.
Elite: Perform single-leg variations or progress toward straight bar dips.
Shoulder health consideration: Lower only to the point where your upper arms are parallel to the ground. Going deeper provides minimal additional tricep work but significantly increases shoulder joint stress, particularly for those with previous injuries or mobility limitations.
Volume recommendations differ by goal. Strength work uses 3-5 sets of 6-10 reps with added weight when possible. Hypertrophy programming calls for 4-6 sets of 12-20 reps at bodyweight with controlled tempo. Train 2-3 times weekly with at least one rest day between sessions.
8. Pike Push-Ups
This movement bridges the gap between horizontal pushing and vertical pressing while delivering exceptional tricep and shoulder stimulus.
Hip angle determines load distribution: The higher you position your hips, the more vertical the pressing angle becomes, shifting emphasis from chest to shoulders and triceps while increasing the difficulty substantially.
Start in a downward dog yoga position with hands shoulder-width apart and hips elevated toward the ceiling. Your body should form an inverted V shape. Bend your elbows to lower your head toward the ground between your hands, then press back up. Unlike standard push-ups, this vertical angle shifts significant load to shoulders and triceps. The long head of the triceps works hardest due to the overhead pressing angle combined with elbow extension. This exercise also builds pressing strength that transfers directly to handstand push-ups.
Progression sequence:
- Pike push-ups with knees bent to reduce angle
- Standard pike push-ups with straight legs
- Feet elevated pike push-ups (feet on box or bench)
- Wall-assisted handstand push-up negatives
- Full handstand push-ups
Each level should be trained until you can complete 4 sets of 8 reps before progressing. Rushing progression increases injury risk, particularly to shoulder joints and rotator cuffs.
Form checkpoint: Your elbows should track at roughly 45 degrees from your body, not tight to your sides and not completely flared. This balances tricep engagement with shoulder safety.
For strength, perform 3-5 sets of 4-6 reps at the most challenging variation you can control. Hypertrophy work uses 4-5 sets of 8-12 reps. Train these 2 times per week as they create substantial fatigue in both triceps and shoulders, requiring adequate recovery.
9. Straight Bar Dips
If you have access to parallel bars or a dip station, straight bar dips become the single most effective bodyweight tricep builder available.
Range of motion determines effectiveness: Full-range dips where you lower until your upper arms break parallel create significantly more muscle activation than partial reps, but they also require adequate shoulder mobility and stability.
Grip parallel bars or dip station handles and press yourself up to a support position with arms fully locked out. Lean slightly forward, then lower your body by bending your elbows until your upper arms are at least parallel to the ground. Press back up to full lockout. The more upright you remain, the more tricep emphasis you create. Leaning forward shifts work toward chest. Keep elbows tucked at about 45 degrees rather than completely pinned to your sides, which creates shoulder impingement, or completely flared, which reduces tricep work. All three tricep heads engage strongly in this movement, with the long head receiving exceptional stimulus due to the stretched position at the bottom.
Scaling options:
Regression: Use resistance bands looped over the bars for assistance, perform partial range dips (top half only), or use a dip assist machine if available.
Progression: Add weight using a dip belt, weighted vest, or backpack loaded with weight plates or heavy books.
Advanced variation: Ring dips significantly increase difficulty due to instability, recruiting more stabilizer muscles throughout the movement.
One critical error to avoid: Never bounce out of the bottom position. This creates high impact forces on the shoulder joint and eliminates the eccentric strength benefit that comes from controlling the descent.
Training frequency and volume: For strength, complete 3-5 sets of 3-6 reps with added weight when possible. Hypertrophy programming uses 4-6 sets of 8-12 reps, potentially at bodyweight with slower tempo. Train dips 2 times per week maximum due to the significant stress placed on elbow and shoulder joints.
10. Tricep Extensions on Rings or TRX
Suspension trainers allow for true tricep isolation in ways fixed bars cannot match due to the constant stability demands.
Instability forces adaptation: The micro-adjustments required to stabilize rings recruit more total muscle fibers while the extended range of motion creates exceptional long head tricep stretch.
Hold TRX handles or gymnastics rings and lean forward into a plank position with arms extended. Keeping your body rigid and elbows in a fixed position, bend only at the elbows to lower your body forward, allowing your hands to move past your head. Press back to the starting position by extending your elbows. This movement is essentially a standing overhead tricep extension where your body provides the resistance. The long head of the triceps dominates this exercise due to the overhead arm position creating maximal stretch. The exercise also builds significant core stability as you must prevent your hips from sagging throughout the movement.
Difficulty modifications:
Easier: Stand more upright by walking feet away from anchor point, reducing the amount of bodyweight you press.
Standard: Body at roughly 45-degree angle to ground.
Harder: Walk feet closer to anchor point, increasing forward lean and resistance.
Advanced: Perform single-arm variations or add weighted vest.
Elbow position is critical for safety and effectiveness. Your elbows should remain fixed in space throughout the movement, acting as hinges. Any elbow movement forward or backward indicates you are using momentum or shoulder movement to compensate for weak triceps.
Strength work calls for 3-4 sets of 6-8 reps at a challenging angle. Hypertrophy responds to 4-5 sets of 10-15 reps with strict form. Train these 2 times per week, allowing 48-72 hours between sessions. The eccentric loading is significant, so soreness may last longer than other tricep exercises.
Forearm and Grip Strength
Grip strength determines how much you can lift, how long you can hang, and how effectively you perform almost every upper body calisthenics movement. Forearms also contribute significantly to overall arm aesthetics and functional performance. These exercises develop crushing grip, support grip, and wrist stability through multiple movement planes that traditional weight training often misses.
11. Dead Hangs
Hanging from a bar seems simple, but it builds fundamental grip endurance and shoulder stability that every advanced calisthenics movement requires.
Time under tension drives adaptation: Your grip and forearm flexors must sustain continuous contraction to support your full bodyweight, creating isometric strength that transfers to every pulling movement you perform.
Grab a pull-up bar with an overhand grip slightly wider than shoulder width. Let your body hang completely still with arms fully extended. Engage your shoulders by pulling them slightly down and back rather than letting them completely relax into passive hang. Hold this position for time. Your forearm flexors, finger flexors, and grip muscles all work to maintain bar contact while supporting your bodyweight. This exercise builds the support grip needed for pull-ups, muscle-ups, and advanced gymnastics movements. Dead hangs also decompress the spine and improve shoulder mobility when performed with proper scapular engagement.
Progression approach:
- Beginner: 3 sets of 10-20 second hangs
- Intermediate: 3 sets of 30-45 second hangs
- Advanced: 3 sets of 60+ second hangs
- Elite: Weighted hangs using dip belt or weighted vest for time
Once you can hang for 60 seconds straight, add weight rather than continuing to extend time. Hanging for multiple minutes provides diminishing returns compared to progressive overload through added resistance.
Grip variations for complete development:
Overhand grip: Standard position, develops finger flexors and general grip.
Underhand grip: Shifts slightly more emphasis to biceps and different finger flexor angles.
Neutral grip: Uses parallel bars or neutral grip attachment, most natural wrist position, often allows longest hang times.
Towel hangs: Drape a towel over the bar and grip the towel instead, dramatically increasing difficulty and building crushing grip strength.
For grip strength, perform 3-4 sets of maximum time hangs 2-3 times per week. This can be done at the end of workout sessions as a finisher or on separate days. Unlike muscle groups that need 48 hours recovery, grip can often be trained more frequently due to the different adaptation mechanisms involved.
12. Farmer’s Carries (Calisthenics Adaptation)
True calisthenics versions use odd objects or modified implements rather than purpose-built weights, building functional grip that transfers to real-world tasks.
Loaded carries develop grip endurance: Unlike static holds, carries force your grip to stabilize weight through movement and momentum changes, creating different adaptation stimuli than isometric holds alone.
Find two equally weighted objects like loaded backpacks, water jugs, heavy books in bags, or sandbags. Hold one in each hand with arms at your sides. Walk forward with upright posture for a set distance or time. Your forearms must maintain continuous contraction to prevent dropping the objects while your stabilizers work to keep your body aligned during movement. This builds the support grip needed for carrying groceries, luggage, and real-world objects. Grip endurance developed through carries improves performance in long pull-up sets and extended hanging work. Your finger flexors and forearm muscles work differently under loaded walking than they do during static holds.
Load progression strategy:
Week 1-2: Use loads you can carry for 60 seconds continuously.
Week 3-4: Same weight for 90 seconds or increase load by 10-15%.
Week 5-6: Continue adding either time or weight, prioritizing whichever improves slower.
Heavy carries (weight you can only hold 30-40 seconds) build pure grip strength. Moderate carries (60-90 seconds) develop grip endurance. Light carries (2+ minutes) train grip stamina but provide less strength benefit.
Unilateral variation: Single-arm carries (suitcase carries) force your core to resist lateral flexion while still building grip. These develop anti-rotation core strength alongside forearm strength. Alternate arms each set or carry for half the distance, switch hands, and carry back.
Volume guidelines recommend 3-4 sets per arm or hand for hypertrophy and endurance. For maximum strength, use heavier loads for 3-5 sets of 30-40 seconds. Train carries 2-3 times weekly, either as standalone grip work or integrated into other training sessions.
13. Wrist Curls and Extensions (Resistance Band)
Isolated wrist work prevents imbalances and builds the smaller forearm muscles that stabilize your wrists during pressing and pulling movements.
Complete forearm development requires direct isolation: While compound movements build overall grip, the wrist flexors and extensors need targeted work to prevent imbalances that lead to elbow pain and reduced pressing strength.
For wrist curls, sit on a bench or chair with your forearm resting on your thigh, holding one end of a resistance band with the other end secured under your foot. Your palm should face up with your wrist extended just beyond your knee. Curl your wrist upward against the band resistance, then slowly lower back to the starting position. This targets the forearm flexors on the palm side of your forearm. For wrist extensions, flip your hand so your palm faces down and extend your wrist upward against band resistance. This hits the forearm extensors on the top of your forearm. Most people have significantly stronger flexors than extensors, creating imbalance. Equal training volume on both sides prevents elbow tendinitis and improves wrist stability.
Difficulty adjustments:
Make it easier: Use lighter resistance band, reduce range of motion, or perform fewer reps per set.
Make it harder: Use heavier band, add pauses at peak contraction, or perform with slower eccentric tempo.
Critical balance point: Your forearm extensors typically need twice as many sets as your flexors because daily activities and most exercises already bias flexor development. If you perform 3 sets of wrist curls, do 6 sets of wrist extensions to create balanced development.
These are high-rep isolation exercises. For strength, perform 3-4 sets of 15-20 reps per exercise. Hypertrophy responds to 4-5 sets of 20-30 reps. Train these 2-3 times per week on days you are not performing heavy grip work. Excessive wrist isolation training can interfere with recovery from heavy pulling and pressing days.
14. Finger Tip Push-Ups
This advanced variation builds finger strength and crushing grip power that translates to rock climbing, grappling, and grip sports.
Finger strength is the limiting factor in many holds: Standard grip training focuses on palm and forearm strength, but individual finger strength determines whether you can maintain difficult grips like crimps, pinches, and small holds.
Set up in a standard push-up position but instead of placing your palms flat, elevate onto your fingertips with fingers spread wide and knuckles elevated off the ground. Lower your body while maintaining finger contact only, then press back up. Your fingers must support your entire bodyweight while also controlling the lowering and pressing phases. This exercise builds the intrinsic muscles of the hand, the finger flexors, and the stabilizers that maintain finger position under load. Start with the easiest variation possible and progress slowly. Finger injuries heal slowly due to limited blood flow in tendons and ligaments.
Safe progression path:
- Wall finger-tip push-ups (hands on wall while standing)
- Elevated finger-tip push-ups (hands on countertop or high box)
- Kneeling finger-tip push-ups on ground
- Full finger-tip push-ups from toes
- Archer finger-tip push-ups or decline variations
Never rush these progressions. Spend at least 3-4 weeks at each level before advancing. Tendon adaptation occurs more slowly than muscle adaptation.
Technique critical point: Keep fingers spread wide and weight distributed across all five fingers. Attempting finger-tip push-ups with only four fingers or narrow finger placement exponentially increases injury risk before you have built adequate conditioning.
Due to the high stress on finger joints and tendons, train these for strength only. Perform 3-4 sets of 3-5 reps, 1-2 times per week maximum. High-rep finger-tip push-ups create overuse injuries rather than building strength. Pair these with adequate rest days and avoid combining them with heavy hanging work or other intensive grip training in the same session.
15. Towel Pull-Ups
Draping a towel over a bar and gripping the towel instead of the bar transforms standard pull-ups into brutal grip builders that develop crushing and support strength simultaneously.
Thickness and instability multiply difficulty: The thicker grip circumference requires more finger flexor activation while the towel’s ability to shift demands constant micro-adjustments that standard bar work does not require.
Drape one or two towels over a pull-up bar and grip the ends of the towel in each hand. Perform pull-ups or chin-ups while maintaining grip on the towels instead of the bar. Your forearms must work significantly harder to maintain grip as the towel material is less secure than a rigid bar and the thicker diameter reduces mechanical advantage. This variation builds the crushing grip strength needed for climbing, grappling, and tool use. The finger flexors and forearm muscles fatigue far faster than in standard pull-ups, making towel pull-ups an exceptional grip-specific exercise. Your pulling strength likely exceeds your towel grip strength by a significant margin, so expect to complete fewer reps than you would on a standard bar.
Progression options:
Single towel, both hands: Easier than two towels, allows closer hand position.
Two towels, hands apart: Standard variation, grip one towel per hand.
Thick towels: Larger diameter increases difficulty compared to thin towels.
Gi material or climbing rope: Even more challenging textures that shift under grip.
L-sit towel pull-ups: Combine grip work with core challenge.
Most athletes find their grip fails well before their pulling muscles fatigue in this exercise. This is normal and indicates you are effectively isolating grip as the limiting factor.
For strength development, perform 3-4 sets of as many reps as possible (likely 3-6 for most people). For grip endurance, use assistance bands to allow 3-4 sets of 8-12 reps where grip rather than pulling strength remains the challenge. Train these 1-2 times per week as they create substantial forearm fatigue that interferes with other pulling work if overtrained.
Advanced Arm Exercises
These movements require significant strength foundations before attempting. They represent the peak of bodyweight arm training and provide ongoing challenge even for advanced athletes. Each exercise builds specialized strength patterns that have minimal equivalent in traditional resistance training.
16. Planche Lean
The planche lean builds straight-arm pressing strength while creating exceptional tricep and forearm demands from a completely different angle than traditional exercises.
Straight-arm strength is a separate quality: Your bent-arm pressing strength does not automatically transfer to straight-arm positions, making dedicated training necessary for advanced gymnastics movements and injury prevention.
Start in a push-up position with hands at hip level and fingers pointing toward your feet. Lean your shoulders forward past your hands while keeping your arms completely straight and your body in a rigid plank. The further you lean, the more your bodyweight shifts onto your hands and the harder your triceps, forearms, and wrists must work to prevent collapse. This exercise builds the foundational strength for planche progressions while developing intense tricep endurance in extended positions. The lateral head of the triceps works especially hard to maintain elbow lockout under load. Wrist conditioning improves dramatically as well since significant bodyweight shifts onto bent wrists.
Progression structure:
Beginner: Minimal lean, shoulders slightly past hands, hold 10-15 seconds.
Intermediate: Moderate lean, shoulders 4-6 inches past hands, hold 20-30 seconds.
Advanced: Significant lean, shoulders 8-10 inches past hands, hold 30+ seconds.
Elite: Progress to tuck planche, advanced tuck planche, and eventually full planche.
Your wrists experience unfamiliar stress in this position. If you have wrist pain, reduce the lean angle, perform the exercise on parallettes or push-up bars to reduce wrist extension, or incorporate additional wrist preparation exercises before attempting planche leans.
Critical form note: Your entire body must remain rigid from head to heels. Any hip sag or arch reduces the effectiveness and increases injury risk. Engage your core, squeeze your glutes, and maintain posterior pelvic tilt throughout the hold.
These are strength and conditioning holds. Perform 3-5 sets of maximum time holds at your current progression level, training 2-3 times per week. Avoid training heavy straight-arm work on consecutive days as connective tissue recovery takes longer than muscle recovery.
17. Typewriter Pull-Ups
This exercise combines pulling strength with unilateral arm work, creating exceptional bicep and lat engagement on the working side.
Unilateral emphasis without full single-arm demand: Typewriter pull-ups allow you to overload one arm at a time while still receiving assistance from the opposite arm, creating a bridge between standard pull-ups and one-arm pull-ups.
Pull yourself up to the top of a pull-up position. Instead of lowering straight down, shift your weight to one side, straightening the opposite arm while keeping your chin above the bar. Slide horizontally across the bar to the other side while maintaining chin height, straightening the first arm as you bend the second. This creates a typewriter motion where you slide from side to side above the bar. Each side receives intense bicep and lat contraction as you shift bodyweight laterally. The working arm’s bicep handles near-maximal load at the end range, while the extended arm provides minimal assistance. This movement pattern builds the specific strength needed for one-arm pull-up progressions.
Scaling difficulty:
Easier: Perform partial range typewriters where you only shift weight slightly side to side rather than fully extending one arm.
Standard: Full typewriter pull-ups with complete arm extension on each side.
Harder: Add weight via weighted vest or dip belt.
Advanced: Pause for 2-3 seconds at each end position before sliding across.
The bicep on the bent-arm side experiences maximum contraction while the extended arm’s tricep works to maintain straight-arm stability. This creates balanced development across antagonistic muscle groups.
Most people can only perform 3-5 quality typewriter pull-ups even if they can do 15+ standard pull-ups. This is normal and reflects the increased unilateral demand. For strength building, complete 3-4 sets of 3-5 full reps (counting one full left-to-right sweep as one rep). Train these 1-2 times per week as they create significant bicep tendon stress at the elbow joint.
18. Archer Push-Ups
Archer push-ups shift most of your bodyweight onto one arm during the pressing motion, building unilateral pressing strength and tricep endurance.
Weight distribution creates unilateral demand: By extending one arm out to the side while the other arm presses, you force the pressing arm to handle 70-80% of your bodyweight instead of the 50% split in standard push-ups.
Set up in a wide push-up position with hands placed significantly wider than shoulder-width. As you lower down, shift your weight to one side while keeping the opposite arm relatively straight and extended out to the side. Press up from the working arm while the extended arm provides minimal assistance. Alternate sides each rep or complete all reps on one side before switching. The pressing arm’s triceps work at near-maximal capacity while the chest and anterior deltoid also contribute significantly. The long head of the tricep receives exceptional stretch at the bottom position on the working arm. This exercise builds the foundational strength for one-arm push-up progressions while developing balanced strength across both arms.
Progression path:
- Beginner: Archer push-ups from knees
- Intermediate: Standard archer push-ups from toes
- Advanced: Archer push-ups with feet elevated
- Elite: Transition to one-arm push-up progressions
The extended arm should remain relatively straight but not completely locked out, which creates elbow hyperextension risk. Maintain a micro-bend in the elbow of the extended arm throughout the movement.
Common error to avoid: Many people rotate their torso toward the working arm to make the exercise easier. Keep your torso square to the ground and your hips level. Any rotation reduces the unilateral demand and decreases the training effect.
For strength, perform 3-5 sets of 4-6 reps per side. Hypertrophy programming uses 4-5 sets of 8-12 reps per side. Train these 2-3 times per week as part of your pushing work. These create more tricep and shoulder stress than standard push-ups, so reduce overall push-up volume on days you program archer variations.
19. Pseudo Planche Push-Ups
This variation combines horizontal pressing with significant straight-arm strength demands, building triceps, forearms, and wrist stability simultaneously.
Hand position shifts leverage dramatically: Moving your hands from shoulder level to hip level changes the torque on your shoulders and elbows, transforming a standard push-up into an advanced strength movement that mimics planche mechanics.
Start in a push-up position but place your hands at hip level rather than shoulder level, with fingers pointing toward your feet or slightly outward. Lean your shoulders forward past your hands. Perform push-ups from this position while maintaining the forward lean. Your triceps must work significantly harder because the hand positioning creates poor mechanical leverage compared to standard push-ups. The lean also creates continuous straight-arm strength demand similar to planche work. The lateral head of the triceps receives exceptional stimulus due to the arm position and straight-arm component. Forearms and wrists must stabilize significant load in an extended position throughout the movement.
Difficulty modifications:
Easier: Reduce the forward lean (move shoulders back toward neutral position over hands), perform on knees, or elevate hands on a box.
Standard: Moderate forward lean, hands at hip level, full push-up range from toes.
Harder: Increase forward lean, elevate feet, or add weight via weighted vest.
Advanced: Progress to tuck planche push-ups or straddle planche push-ups.
Wrist preparation is essential before attempting these. If you lack wrist flexibility or strength, the extended wrist position will cause pain before your triceps fatigue. Use parallettes, push-up bars, or gradually build wrist conditioning through other exercises before loading pseudo planche push-ups.
Training parameters: These are strength-focused movements. Perform 3-5 sets of 3-6 reps, training 2 times per week maximum. The combination of pressing and straight-arm demands creates significant recovery requirements. Allow at least 48-72 hours between sessions and avoid combining these with other high-intensity tricep or shoulder work.
20. One-Arm Push-Up (Progression)
The one-arm push-up represents peak bodyweight pressing strength and requires exceptional tricep development combined with core stability and scapular control.
Single-limb work exposes imbalances: Most people discover significant strength differences between sides when attempting one-arm work, making this progression valuable for identifying and correcting asymmetries before they become problems.
Start in a push-up position but place one hand on the ground while the other hand goes behind your back. Spread your feet wider than standard push-up width for stability. Lower your body while maintaining square shoulders and level hips, then press back up using only the working arm. The entire load of your bodyweight focuses on one tricep, one shoulder, and one side of your chest. The working arm’s tricep operates at maximum capacity throughout the range of motion. Core engagement is critical to prevent rotation and maintain body alignment. Most people cannot perform a one-arm push-up without significant training, making the progression pathway essential.
Complete progression sequence:
- Elevated one-arm push-ups with hand on countertop or high surface
- Box one-arm push-ups with hand on progressively lower boxes
- Negative one-arm push-ups (lower slowly with one arm, push up with two)
- Partial range one-arm push-ups (top half range only)
- Full one-arm push-ups from the floor
- Deficit one-arm push-ups with hand on parallettes or books for increased range
Spend 2-4 weeks at each progression level, achieving 3 sets of 5-8 reps before advancing. Rushing the progression leads to elbow tendinitis and shoulder impingement issues.
Critical technique points:
Your feet need to be wide for stability, typically 1.5-2 times shoulder width. Narrower stances make balance nearly impossible.
Keep your working shoulder packed down and back, not allowing it to shrug up toward your ear.
Your hips and shoulders must remain level throughout the movement. Any rotation indicates you are not ready for full one-arm work yet.
The non-working arm can be placed behind your back, held out to the side, or positioned however feels most stable as long as it provides no pushing assistance.
For strength development, perform 3-4 sets of 3-5 reps per arm at your current progression level. Train 2 times per week maximum. One-arm push-ups create significant asymmetric loading on your shoulder girdle, requiring more recovery time than bilateral exercises.
Strategic Programming
Building complete arm development through calisthenics requires understanding how to structure training frequency, volume, and progression to maximize results while preventing overuse injuries. This section connects individual exercises into cohesive programming that drives continuous improvement.
Training Frequency for Arm Development
Your arms receive work during almost every upper body calisthenics movement, making dedicated arm frequency lower than you might expect from traditional bodybuilding splits.
Overlap drives total training stress: Unlike isolation exercises in a gym where bicep curls only fatigue biceps, calisthenics pulling movements stress biceps while also working back and grip, meaning your arms accumulate fatigue faster than isolation-trained muscles.
For strength-focused training, direct arm work 2-3 times per week produces optimal results. This allows for heavy loading sessions with adequate recovery between them. Monday might include chin-ups and dips, Wednesday could feature inverted rows and pike push-ups, and Friday might incorporate band curls and tricep extensions. Each session provides 48-72 hours of recovery before the next stimulus.
Hypertrophy training frequency options:
Option one: Three moderate-volume sessions spread evenly through the week (Monday, Wednesday, Friday) hitting all arm muscle groups each session.
Option two: Four higher-frequency sessions using upper/lower split where upper days include arm work (Monday, Tuesday, Thursday, Friday with push/pull splits).
Option three: Two high-volume arm-focused sessions per week (Tuesday, Saturday) combined with general upper body work on other days.
Your pulling and pushing movements already tax your arms, so adding high-volume dedicated arm work on top of heavy pull-up and dip sessions often leads to elbow tendinitis and chronically fatigued forearms. Count the total arm volume across all exercises, not just isolation work, when planning frequency.
Recovery markers to monitor:
If your grip feels constantly weak, your elbows ache during rest days, or your chin-up numbers decrease despite consistent training, you are exceeding your recovery capacity. Reduce arm training frequency or volume until these symptoms resolve. Most people need to reduce volume rather than add it when progress stalls.
Beginners should start with 2 sessions per week to build work capacity. Intermediate trainees can handle 3 sessions. Advanced athletes might use 3-4 sessions but with carefully managed volume to avoid overtraining. More sessions does not equal better results when recovery is inadequate.
Sets and Reps for Strength vs. Hypertrophy
Calisthenics arm training follows similar volume guidelines to resistance training, but progression mechanics differ due to bodyweight loading limitations.
Strength parameters prioritize intensity over volume: Low-rep work with high relative intensity builds neurological efficiency and maximum force production, but calisthenics makes this challenging because you cannot easily add small increments of load like you can with dumbbells.
For strength development in arm exercises, use these guidelines:
Reps per set: 3-6 reps for compound movements like chin-ups and dips, 6-10 reps for isolation work like band curls.
Sets per exercise: 3-5 sets, potentially more for competition lifters or advanced athletes chasing specific strength goals.
Rest periods: 2-4 minutes between sets to allow for full neurological recovery and maximum performance on subsequent sets.
Progression method: Increase reps until you hit the top of the range (6 reps for compound, 10 for isolation), then increase difficulty through progression variations, added weight, or tempo manipulation.
Hypertrophy training uses higher volume with moderate intensity:
Reps per set: 6-12 reps for compound movements, 12-20 reps for isolation exercises targeting specific muscle heads.
Sets per exercise: 4-6 sets per muscle group across all exercises in a session.
Rest periods: 60-90 seconds between sets to maintain metabolic stress while allowing partial recovery.
Progression method: Increase reps until you reach the top of the range, then increase difficulty or add sets before moving to harder progressions.
Total weekly volume recommendations:
For biceps strength: 6-10 total working sets across all exercises per week.
For biceps hypertrophy: 12-20 total working sets per week.
For triceps strength: 9-12 total working sets per week (higher than biceps because triceps are larger and recover faster).
For triceps hypertrophy: 15-25 total working sets per week.
For forearms and grip: 6-12 total working sets per week (they receive significant work during all pulling movements).
These ranges include all exercises that target the muscle group. Three sets of chin-ups plus three sets of inverted rows equals six total bicep sets, not separate counting for each exercise.
Diminishing returns warning: Exceeding these volume recommendations rarely produces better results and frequently leads to overtraining symptoms, especially in forearms and elbows which are involved in nearly all upper body work. Start at the lower end of volume ranges and only increase if progress stalls after 3-4 weeks.
Progression Strategies for Continuous Growth
Bodyweight training requires different progression approaches than adding weight to a barbell, making progression planning critical for long-term development.
Progressive overload remains the fundamental driver: Your muscles adapt only when you increase the training stimulus beyond what they have previously experienced, but calisthenics requires creative methods to apply this principle.
The most effective progression strategies for calisthenics arm training include:
Leverage progression: Change body angles or limb positions to increase the percentage of bodyweight your arms must move. Moving from standard push-ups to archer push-ups to one-arm push-ups represents leverage progression. This is the primary progression method in calisthenics.
Tempo manipulation: Slow down the eccentric (lowering) phase to 3-5 seconds, add pauses at peak contraction or stretched positions, or reduce momentum between reps. A 3-1-3 tempo chin-up (three seconds down, one second pause, three seconds up) creates significantly more time under tension than a standard chin-up.
Range of motion extension: Increase how far you lower or raise during an exercise. Deficit push-ups on parallettes or books create deeper stretch positions. Full range-of-motion dips where upper arms go slightly below parallel produce more stimulus than partial reps.
Volume progression: Add sets or reps within your current variation before moving to a harder progression. Going from 3 sets of 6 chin-ups to 4 sets of 8 chin-ups increases total volume by 78%, providing significant growth stimulus.
Frequency progression: Add an extra training session per week for lagging muscle groups while maintaining volume per session, spreading the same total weekly work across more days for better recovery between sessions.
Added resistance: Use weighted vests, dip belts, backpacks filled with books, or resistance bands to increase load while maintaining familiar movement patterns. This most closely mimics traditional progressive overload.
Combination progressions: Mix methods within a training cycle. Week 1-3 might focus on volume progression, weeks 4-6 on tempo manipulation, and weeks 7-9 on leverage progression to harder variations.
Most athletes should use leverage progression as the primary method, adding reps and sets until they can perform 3-4 sets of 10-12 reps at their current variation, then advancing to the next difficulty level. Tempo and range of motion progressions work well when you are between progression levels, not quite ready for the next variation but finding the current one too easy at standard execution.
When to progress vs. when to add volume:
Progress to a harder variation when you can complete your target sets and reps with clean form and still feel like you could do 2-3 more reps on the final set.
Add volume or intensity (tempo, pauses) when your form breaks down before you hit your target reps, indicating you are not ready for progression yet.
Deload every 4-6 weeks by reducing volume by 40-50% for one week to allow accumulated fatigue to dissipate and supercompensation to occur.
Resistance Training vs. Calisthenics for Arms
Understanding the functional differences between weighted arm training and bodyweight arm work helps you compensate for the inherent limitations in calisthenics programming.
Resistance training advantages for arm development:
Precise load control allows for exact progression increments. Adding 2.5 pounds to a dumbbell curl provides small, manageable steps that calisthenics leverage changes cannot match. You can progress every week with micro-loading, while bodyweight progressions often require large strength jumps.
Direct isolation of specific muscle heads becomes simple. Concentration curls, preacher curls, and cable curls each target different bicep regions with precision that bodyweight exercises struggle to replicate.
Tricep work offers exceptional variety through rope extensions, overhead extensions, kickbacks, and skull crushers, each hitting different angles that create complete development.
Forearm and grip exercises include wrist rollers, reverse curls, and thick bar work that precisely target specific functions (flexion, extension, pronation, supination) which calisthenics addresses less completely.
Equal resistance through full range of motion occurs with free weights. Your bicep works as hard at the top of a curl as at the bottom, while many bodyweight movements have easier and harder portions of the range.
Calisthenics advantages for arm development:
Functional integration means your arms never work in isolation but always coordinate with core, shoulders, and stabilizers, building strength that transfers better to real-world activities.
No equipment dependency allows training anywhere without gym access or purchasing weights, reducing barriers to consistency.
Decreased injury risk in specific areas occurs because you cannot load beyond what your bodyweight and strength allow. You cannot attempt a 100-pound dumbbell curl on weak biceps, but you can attempt pull-ups with built-in safety.
Kinetic chain development happens automatically as exercises like chin-ups and dips require total-body tension and coordination, building athleticism alongside arm strength.
Scalability across fitness levels exists through regression and progression options that accommodate complete beginners to elite athletes using the same exercise family.
Calisthenics limitations and compensation strategies:
Limitation: Bicep isolation is difficult because most pulling movements distribute load across back muscles as well.
Compensation: Use resistance bands for direct bicep curls, incorporate pelican curls and bodyweight curls using door frames, and perform high-volume chin-up work with controlled tempo to increase bicep time under tension.
Limitation: Small progression increments are impossible. The jump from regular push-ups to archer push-ups or from assisted chin-ups to full chin-ups represents significant difficulty increases.
Compensation: Use tempo manipulation and volume progression to bridge gaps. Add weighted vests or backpacks with adjustable loads to create smaller steps. Resistance bands can also add or remove small amounts of assistance or resistance.
Limitation: Constant tension is hard to maintain. The lockout positions in push-ups and pull-ups provide momentary rest that isolation curls do not.
Compensation: Eliminate lockouts by stopping just short of full extension, use pauses at stretched positions instead of peak contraction, and incorporate isometric holds at various points in the range of motion.
Limitation: Forearm pronation and supination training is limited compared to dumbbell work where you can rotate your grip during movements.
Compensation: Rotate through multiple grip positions (overhand, underhand, neutral) across different exercises and training days. Use resistance bands for direct wrist rotation work. Incorporate odd object carries and towel work to create varied grip demands.
The most effective approach for many athletes combines both methods. Use calisthenics for compound arm work that builds functional strength (chin-ups, dips, push-ups), then add resistance bands or light dumbbells if available for direct isolation work that addresses specific weaknesses or aesthetic goals. This hybrid approach captures the benefits of both training modalities while compensating for their individual limitations.
Complete Sample Arm Workout Programs
Applying the principles and exercises covered requires structured programming that balances volume, intensity, and recovery across training days.
Context matters for program selection: Your current strength level, available training time, recovery capacity, and specific goals determine which program structure produces the best results for your situation.
Beginner Program (2 days per week, full body with arm emphasis)
This program builds foundational strength and work capacity before attempting higher volumes or advanced variations.
Day 1: Monday
- Resistance band-assisted chin-ups: 4 sets of 5-8 reps
- Bench dips (knees bent): 4 sets of 10-12 reps
- Inverted rows (bar at hip height): 3 sets of 8-10 reps
- Resistance band bicep curls: 3 sets of 12-15 reps
- Dead hangs: 3 sets of 15-20 seconds
Day 2: Thursday
- Close-grip push-ups (from knees if needed): 4 sets of 8-12 reps
- Eccentric chin-ups (jump up, lower slowly): 4 sets of 3-5 reps with 5-second lowering
- Pike push-ups (knees bent): 3 sets of 6-8 reps
- Resistance band tricep extensions: 3 sets of 12-15 reps
- Farmer’s carries with light load: 3 sets of 45 seconds
Rest 90-120 seconds between sets. Focus on perfect form over adding reps. Progress by adding reps until you hit the top of the range, then increase difficulty or reduce assistance.
Intermediate Program (3 days per week, push/pull/full split)
This program increases volume and introduces more exercise variety for complete development.
Monday: Pull Focus
- Chin-ups: 4 sets of 6-10 reps
- Inverted rows (feet elevated): 4 sets of 10-12 reps
- Towel pull-ups: 3 sets of 4-6 reps
- Resistance band bicep curls: 3 sets of 15-20 reps
- Bodyweight bicep curls (door frame): 3 sets of 8-12 reps
Wednesday: Push Focus
- Dips (parallel bars or bench with feet elevated): 4 sets of 8-12 reps
- Diamond push-ups: 4 sets of 10-15 reps
- Pike push-ups: 3 sets of 8-10 reps
- TRX tricep extensions: 3 sets of 10-12 reps
- Resistance band tricep extensions: 3 sets of 15-20 reps
Friday: Full Arms and Grip
- Typewriter pull-ups: 3 sets of 4-6 reps
- Archer push-ups: 3 sets of 6-8 reps per side
- Dead hangs: 3 sets of 30-40 seconds
- Farmer’s carries (moderate weight): 4 sets of 60 seconds
- Resistance band wrist curls: 3 sets of 20 reps
- Resistance band wrist extensions: 4 sets of 20 reps
Rest 60-90 seconds between sets for hypertrophy focus. Progress by adding reps, then advancing to harder variations when you consistently hit the top of rep ranges.
Advanced Program (4 days per week, skill/strength/volume split)
This program incorporates advanced variations, higher volumes, and specific skill work for continuous progression.
Monday: Skill and Straight-Arm Strength
- Planche lean holds: 5 sets of 20-30 seconds
- Pseudo planche push-ups: 4 sets of 5-8 reps
- One-arm push-up progressions: 4 sets of 4-6 reps per side
- Resistance band bicep curls (heavy band): 4 sets of 10-12 reps
Tuesday: Pull Strength
- Weighted chin-ups: 5 sets of 4-6 reps
- Typewriter pull-ups: 3 sets of 5-7 reps
- Pelican curls: 3 sets of 6-8 reps
- Towel pull-ups: 3 sets of 6-8 reps
Thursday: Push Volume
- Weighted dips: 4 sets of 8-10 reps
- Diamond push-ups: 4 sets of 15-20 reps
- Pike push-ups (feet elevated): 4 sets of 10-12 reps
- TRX tricep extensions: 4 sets of 12-15 reps
- Bench dips (feet elevated, weight on lap): 3 sets of 15-20 reps
Saturday: Arms and Grip Specialization
- Archer chin-ups: 3 sets of 5-7 reps per side
- Resistance band bicep curls: 4 sets of 15-20 reps
- Bodyweight bicep curls: 3 sets of 12-15 reps
- Resistance band tricep extensions: 4 sets of 15-20 reps
- Dead hangs (weighted): 4 sets of 30-45 seconds
- Farmer’s carries (heavy): 4 sets of 45 seconds
- Finger-tip push-ups: 3 sets of 4-6 reps
- Wrist curls and extensions: 3 sets of 25 reps each
Rest periods vary by exercise intensity, ranging from 2-3 minutes for heavy weighted movements to 60-90 seconds for volume work. Deload every fourth week by reducing volume by 50% while maintaining movement patterns.
These programs provide starting frameworks. Adjust exercise selection, volume, and frequency based on your individual recovery capacity, schedule constraints, and specific goals. The principles of progressive overload, adequate recovery, and balanced development matter more than following any specific program exactly as written.
Building powerful arms through calisthenics takes longer than traditional weightlifting because progression increments are larger and isolation is more difficult. The tradeoff comes in functional strength that transfers to real-world activities, training flexibility that does not depend on equipment access, and movement competency that reduces injury risk across all physical activities.
The exercises, progressions, and programming strategies outlined here provide everything needed to develop complete arm strength and size using primarily bodyweight methods. Consistency over months and years produces results that match or exceed what most people achieve in gyms, with the added benefit of movement skills and body control that pure resistance training never builds.


ABOUT THE AUTHOR
Carlos Grider is a former U.S. Marine, CrossFit Level 1 trainer, certified personal trainer, and the creator of Forge the Flow. After nearly a decade supporting combat operations and special operations in austere environments — and another decade traveling across 65+ countries as a nomad and adventure athlete — Carlos distilled everything he learned about staying strong, capable, and resilient without a gym into the Forge the Flow training system. He has trekked solo to Everest Base Camp, surfed Bali through the pandemic, trained Muay Thai in Thailand, and run self-guided marathons across four continents — all maintained on minimalist training built for real life. He writes about the fitness methods that actually travel.
Click here to learn more about Carlos's story.