Your legs are shaking, your mind is screaming to stop, but the clock shows you’ve only held the position for 18 seconds.
This is where most people quit. They mistake the burn for weakness when it’s actually your nervous system learning to recruit muscle fibers you didn’t know existed. Isometric leg exercises don’t look impressive on social media, they don’t produce sweat-drenched finisher videos, and they definitely don’t give you the dopamine hit of crushing a heavy barbell squat. But what they do deliver is something far more valuable for anyone chasing longevity and durable fitness: strength that transfers to every single movement pattern you’ll ever perform, built with nothing more than your bodyweight and the ability to hold tension.
The military figured this out decades ago. So did gymnasts, rock climbers, and anyone who needs their legs to function flawlessly under stress without access to a fully loaded gym. Static holds build tendon strength, improve muscle fiber recruitment, enhance joint stability, and create the kind of baseline leg power that makes rucking easier, pistol squats cleaner, and your knees more resilient when life demands quick direction changes on uneven terrain.
This guide breaks down exactly how to use isometric leg exercises to build strength that lasts.

Table of Contents
What Makes Isometric Leg Exercises Different
Isometric training is strength work without movement, and that single difference changes everything about how your muscles adapt.
When you hold a wall sit, a lunge position, or a single-leg squat at the bottom, you’re creating maximum tension without any of the momentum that typically helps you through the hard parts of a rep. Your muscles have nowhere to hide. There’s no eccentric phase to store elastic energy, no concentric burst to push through a sticking point. Just pure, sustained contraction that forces every available muscle fiber to fire and hold.
Here’s what happens inside your body during isometric holds:
- Your nervous system learns to recruit high-threshold motor units faster and more efficiently
- Tendons experience controlled load that stimulates collagen production and structural adaptation
- Stabilizer muscles activate to maintain position, building joint integrity you won’t get from traditional reps
- Blood flow is temporarily restricted, creating a metabolic environment similar to occlusion training without the cuffs
This isn’t just about muscle size or one-rep max strength. Isometrics build what strength coaches call “positional strength,” the ability to own a specific joint angle under load. That’s the foundation for every athletic movement you care about. Your ability to hold a deep squat position translates directly to how explosive you can be out of the bottom. Your capacity to maintain tension in a split squat stance determines how stable you are during loaded carries and rucking. The strength you build in a single-leg wall sit makes pistol squats and step-ups exponentially more controlled.
Most training programs skip this entirely. They chase progressive overload through added weight or higher reps, ignoring the fact that your body can’t express strength through a range of motion it doesn’t own isometrically first. You end up with gaps, positions where your muscles are strong in motion but weak when forced to stabilize. That’s where injuries happen, where performance plateaus, and where your training stops translating to real-world durability.
Isometric leg work fills those gaps. It teaches your body to produce and maintain force in the exact positions where you’re most vulnerable. And because it requires zero equipment, you can program it anywhere: in a hotel room, at a park, in your garage, or 10 minutes before a ruck when you want to prime your nervous system without accumulating fatigue.
The Core Isometric Leg Exercises You Need
These movements form the foundation of any effective isometric leg program. Each one targets specific angles and muscle groups while building the kind of static strength that carries over to everything else you do.
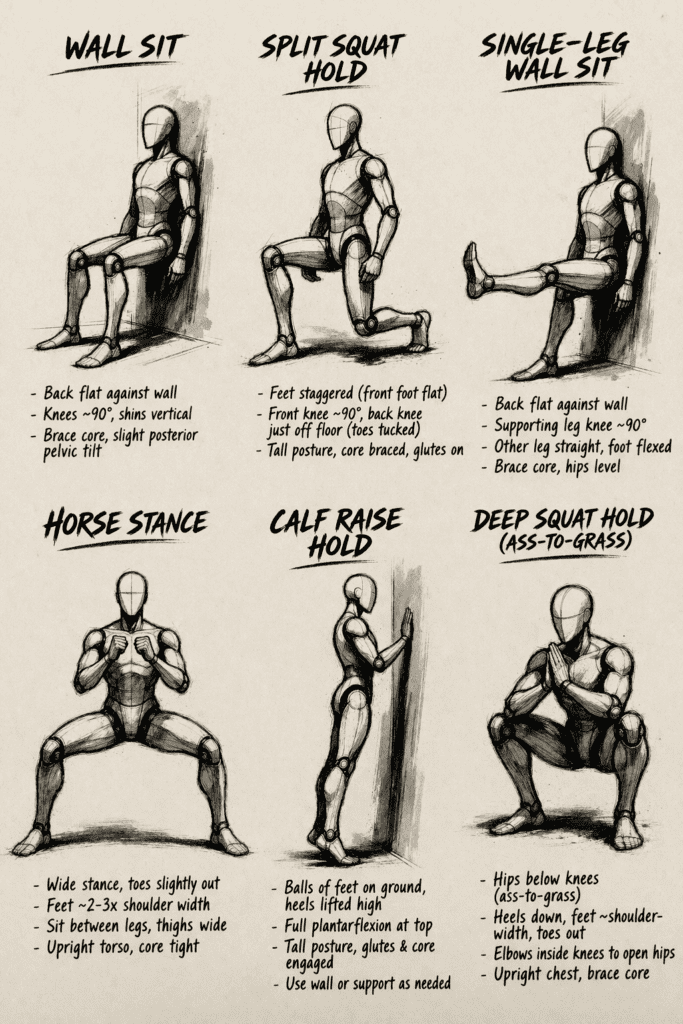
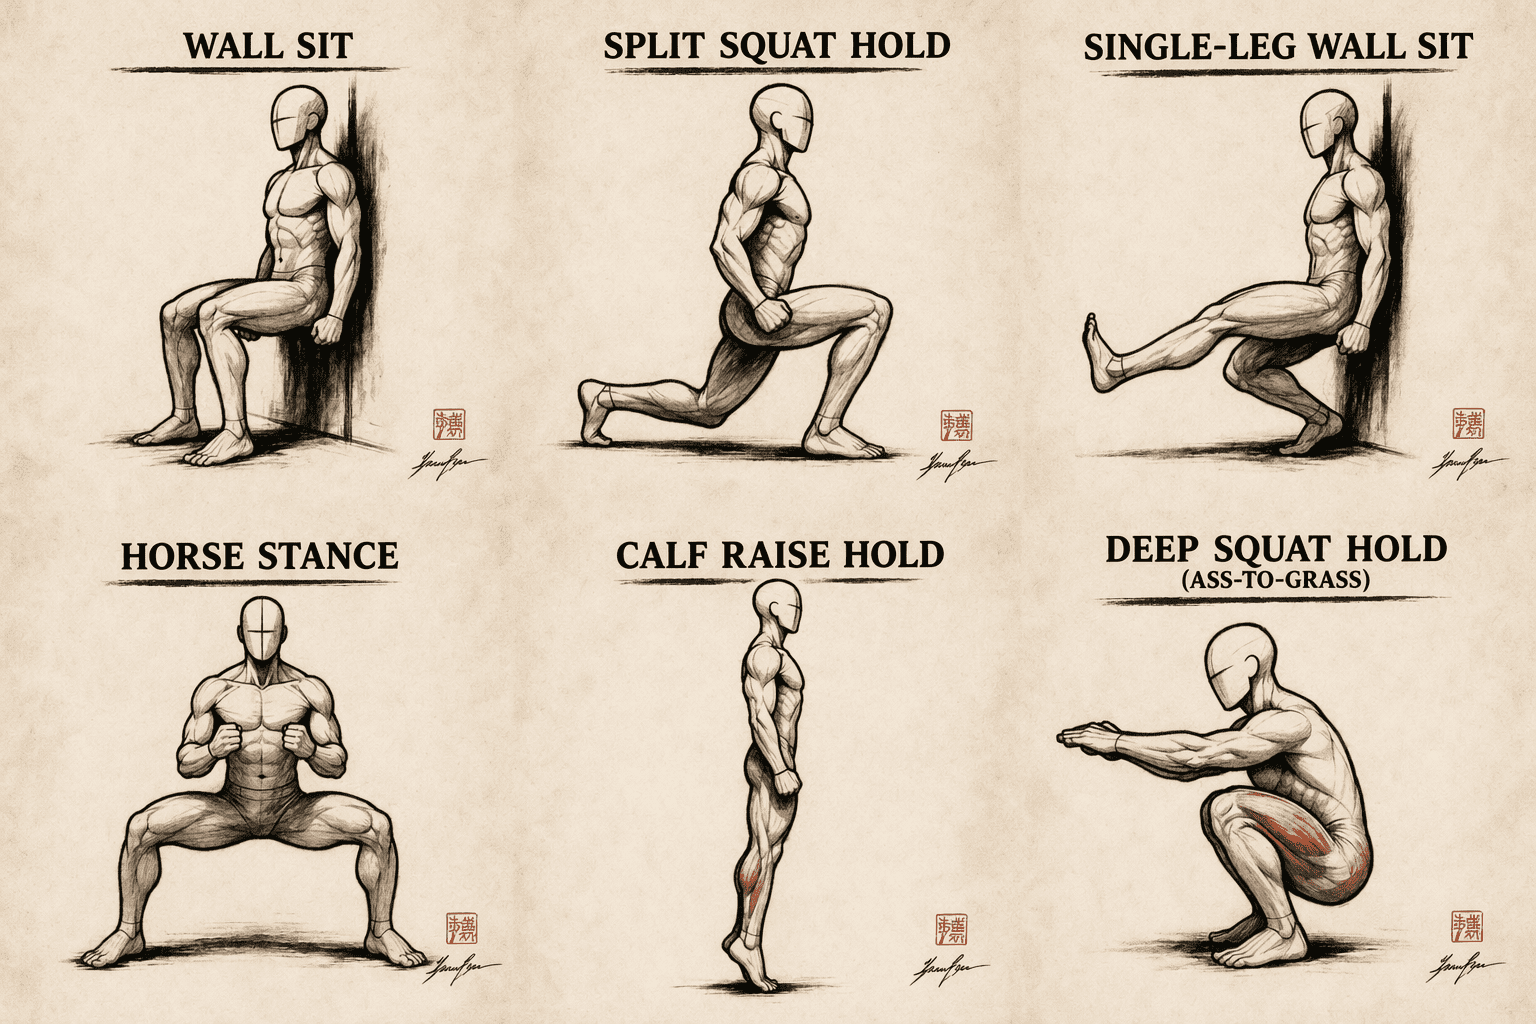
Wall Sit
Back against a wall, slide down until your thighs are parallel to the ground, knees at 90 degrees. Your feet should be far enough from the wall that your shins stay vertical. This is the king of quad-dominant isometric holds, and it’s brutally simple. Keep your core braced, your back flat against the wall, and your weight distributed evenly through both feet. The burn starts around 20 seconds, and most people fold by 45. Push past that, and you’ll start building real capacity.
Your quads are doing the primary work here, but your glutes and core are working overtime to maintain the position. Don’t let your knees cave inward. Don’t let your hips drop below parallel unless you’re intentionally working a deeper angle. And don’t hold your breath. Controlled breathing keeps your nervous system calm and lets you hold longer.
Split Squat Hold (Front Foot Elevated)
Set up in a lunge position with your front foot on a low step or platform, back knee hovering an inch off the ground. Your torso stays upright, front knee tracks over your toes, and your hips stay square. This position hammers your front leg while your back leg stabilizes, building unilateral strength that directly transfers to walking, running, and any single-leg movement pattern.
The elevation of the front foot increases range of motion and puts more tension on the working leg. If you don’t have a platform, do this from the floor, but the elevated version is superior for building strength through a fuller range. Hold for time on one side, then switch. Don’t alternate back and forth quickly. Give each leg the full work period.
Single-Leg Wall Sit
Same setup as the bilateral wall sit, but lift one foot off the ground and extend that leg straight out in front of you. Now you’re supporting your entire bodyweight on one leg while maintaining the same 90-degree knee angle. This is significantly harder, and most people won’t last 15 seconds the first time they try it.
This exercise exposes strength imbalances instantly. If one leg gives out faster than the other, you’ve found a weak link. It also builds the kind of single-leg static strength that makes pistol squats and single-leg box step-ups far more controlled. Keep your hips level. Don’t let the working side drop or rotate. Your core has to work hard to keep everything aligned.
Horse Stance
Feet wider than shoulder-width, toes pointed forward or slightly out, squat down until your thighs are parallel to the ground. Your weight stays centered between both feet, your torso stays upright, and your knees track over your toes. This is a foundational position in martial arts for a reason. It builds hip stability, adductor strength, and the ability to generate force from a wide base.
Most people don’t train their legs in this width and angle, which means it hits muscle fibers and movement patterns that standard squats miss. Your adductors, glutes, and quads all share the load. Keep tension through your entire lower body. Don’t let your knees collapse inward. Don’t round your lower back. This should feel like controlled, distributed tension, not a collapse into the bottom position.
Calf Raise Hold (Top Position)
Stand on the edge of a step with the balls of your feet on the surface and your heels hanging off. Rise up onto your toes as high as possible, then hold that top position. Your calves are under maximum contraction, your ankles are stabilizing, and your foot intrinsics are working to keep you balanced.
For added difficulty, do this on one leg. The single-leg version builds ankle stability and calf strength that translates directly to running, jumping, and any movement that requires explosive plantar flexion. Hold at the peak, not halfway up. You want maximum range and maximum tension.
Deep Squat Hold (Ass-to-Grass)
Drop into the deepest squat position you can achieve with your heels on the ground, knees tracking over your toes, and your torso as upright as possible. This isn’t a working hold in the same way a wall sit is. This is a mobility and positional strength drill that teaches your body to own the bottom of the squat.
Most people lack the ankle mobility, hip mobility, or positional awareness to hold this comfortably. That’s exactly why you should practice it. Spend time here daily. Let your body adapt. Use your hands for light support if needed, but work toward a fully unsupported hold. The better you get at owning this position, the stronger and safer every squat variation becomes.
Each of these exercises builds strength at specific joint angles while teaching your nervous system to maintain tension under fatigue. You don’t need to do all of them in every session. Pick two or three, rotate them throughout the week, and focus on adding time under tension as you adapt.
How to Structure Your Isometric Leg Training
Programming isometric leg work isn’t complicated, but it does require intention. You’re not just adding random holds to the end of a workout. You’re building a training block that treats static strength as a primary goal.
Here’s how to structure a standalone isometric leg session:
- Warm up with movement. Spend 5 to 8 minutes moving through bodyweight squats, lunges, leg swings, and hip circles. Your joints need to be warm and your nervous system needs to be awake before you ask it to maintain maximum tension.
- Start with the hardest exercise first. Your nervous system is freshest at the beginning of the session. If you’re doing single-leg wall sits or front-foot-elevated split squat holds, do them early when you can give them full focus and effort.
- Work in timed sets, not reps. Set a timer for 30, 45, or 60 seconds depending on the exercise and your current capacity. Hold the position with maximum tension for the entire duration. Rest 60 to 90 seconds between sets.
- Perform 3 to 5 sets per exercise. You’re chasing time under tension, not volume. Three high-quality sets where you’re fighting to hold position in the final 10 seconds will build more strength than five sets where you cruise through comfortably.
- Finish with a mobility hold. End every session with a deep squat hold or a passive lunge stretch. This signals to your nervous system that the work is done and helps maintain the range of motion you just loaded.
You can also use isometrics as a primer before strength work. A 20-second wall sit before a set of goblet squats wakes up your quads and improves muscle fiber recruitment for the working sets. A 15-second single-leg wall sit on each side before pistol squat practice teaches your body to own the positions it’s about to move through under load.
Or you can program them as a finisher. After a ruck, after a kettlebell session, or after a bodyweight HIIT block, finish with 2 to 3 isometric holds taken to near-failure. This adds volume without adding joint stress, and it builds mental toughness when your legs are already fatigued.
Frequency matters. Isometric training doesn’t destroy muscle tissue the way heavy eccentric loading does, which means you can train it more often without running into recovery issues. Three to four sessions per week is sustainable for most people. You can even do light isometric work daily if you keep the intensity moderate and the total volume low.
Progressive overload with isometrics comes from adding time, not weight. If you can hold a wall sit for 45 seconds this week, aim for 50 seconds next week. If you can hold a single-leg wall sit for 12 seconds, push for 15. Small, consistent increases in time under tension produce significant strength gains over weeks and months.
Common Mistakes That Kill Your Progress
Isometric training looks simple, and that’s exactly why people screw it up. They assume holding still is easy, so they don’t bring the same focus and intensity they’d bring to a barbell squat. Then they wonder why they’re not getting stronger.
Mistake: Letting your position drift during the hold.
The whole point of isometric work is maintaining a specific joint angle under tension. If your hips rise during a wall sit, if your torso leans forward during a split squat hold, or if your knee collapses inward during a single-leg wall sit, you’re not training the position you think you are. Set your position with intention, then fight like hell to keep it locked in for the entire duration.
Mistake: Holding your breath.
You can’t create maximum tension while suffocating your nervous system. Breathe steadily and rhythmically throughout the hold. Inhale through your nose, exhale through your mouth, and keep your core braced without cutting off oxygen. Breath-holding might help you squeeze out an extra second or two, but it tanks your performance on subsequent sets and teaches terrible movement habits.
Mistake: Going too light or too easy.
Isometric holds should be hard. If you finish a set thinking “that was fine,” you didn’t create enough tension or you didn’t hold long enough. The last 10 to 15 seconds of a properly executed isometric hold should feel like a fight. Your muscles should be shaking, your mind should be begging you to stop, and you should have to actively coach yourself through the discomfort. That’s where adaptation happens.
Mistake: Skipping unilateral work.
Bilateral exercises like wall sits and horse stance holds are valuable, but they let your strong side compensate for your weak side. Single-leg isometric work exposes imbalances and forces each leg to develop strength independently. If you’re only doing bilateral holds, you’re leaving gaps in your training.
Mistake: Training isometrics only at one joint angle.
Isometric strength is angle-specific. If you only train wall sits at 90 degrees, you’ll be strong at 90 degrees but weak at 110 or 70. Vary your knee angles, hip angles, and stance widths. Hold quarter squats, half squats, and deep squats. Train split squat holds with your front knee at different angles. This builds strength across the full range of motion, not just at one point.
Fix these mistakes, and your results accelerate. Ignore them, and you’ll spin your wheels doing holds that feel hard but don’t actually build the strength you’re chasing.
Beginner Protocol: Building Your Foundation
If you’re new to isometric leg training, don’t jump straight into 60-second single-leg wall sits. Start with positions you can hold with good form, then add time and difficulty as your body adapts.
Week 1 to 2: Learn the positions
- Wall Sit: 3 sets of 20 seconds, 60 seconds rest
- Split Squat Hold (both sides): 3 sets of 15 seconds per leg, 45 seconds rest
- Deep Squat Hold: 2 sets of 20 seconds, no rest needed
Focus on form over duration. Your goal is to learn what proper position feels like and to build the neurological pathways that let you maintain tension without compensation. Don’t push to failure yet. End each set knowing you could have held longer.
Week 3 to 4: Add time and intensity
- Wall Sit: 4 sets of 30 seconds, 60 seconds rest
- Split Squat Hold (both sides): 3 sets of 20 seconds per leg, 45 seconds rest
- Horse Stance: 3 sets of 25 seconds, 60 seconds rest
- Deep Squat Hold: 2 sets of 30 seconds, no rest needed
Now you’re starting to push closer to failure. The last five seconds of each set should require genuine effort. Your legs should feel fatigued after the session, but not destroyed. You should be able to walk, ruck, or train other movement patterns the next day without significant soreness.
Week 5 to 6: Introduce unilateral work
- Wall Sit: 4 sets of 40 seconds, 60 seconds rest
- Single-Leg Wall Sit (both sides): 3 sets of 10 seconds per leg, 60 seconds rest
- Split Squat Hold, Front Foot Elevated (both sides): 3 sets of 20 seconds per leg, 45 seconds rest
- Deep Squat Hold: 2 sets of 40 seconds, no rest needed
Single-leg work is significantly harder. Don’t be discouraged if you can only hold for 8 or 10 seconds at first. That’s normal. Your nervous system is learning to stabilize on one leg under maximum tension, and that takes time. Be patient, stay consistent, and trust the process.
By the end of six weeks, you’ll have built a legitimate base of isometric leg strength. Your tendons will be more resilient, your stabilizer muscles will be more active, and you’ll own positions that most people can’t even get into, let alone hold under tension.
Advanced Protocol: Maximizing Static Strength
Once you’ve built a foundation, you can push isometric training into territory that builds serious strength and exposes weaknesses most people never address.
Angle variation protocol
Instead of always holding wall sits at 90 degrees, program holds at multiple angles to build strength across the full range of motion.
- High Wall Sit (120-degree knee angle): 3 sets of 45 seconds
- Parallel Wall Sit (90-degree knee angle): 3 sets of 40 seconds
- Deep Wall Sit (70-degree knee angle): 3 sets of 30 seconds
Rest 90 seconds between sets. Perform all sets at one angle before moving to the next. This builds positional strength at the angles where you’re weakest and teaches your nervous system to produce force across the entire squat pattern.
Single-leg density protocol
Set a timer for 10 minutes. Perform single-leg wall sits, alternating legs every set, resting as needed. Your goal is to accumulate as much total time under tension as possible within the 10-minute window.
Start with 8 to 10 seconds per leg. When you can consistently hit 12 seconds or more, increase the target time. Track your total volume each session and aim to beat it the next time you run this protocol. This builds work capacity and mental toughness while hammering unilateral strength.
Loaded isometric holds
Add external load to increase tension without increasing time. Hold a kettlebell or backpack at chest height during a wall sit. Wear a weighted vest during a split squat hold. Hold dumbbells at your sides during a single-leg wall sit.
The added load forces your muscles to generate more force to maintain the same position. This is true progressive overload. You’re not changing the angle or the duration, you’re increasing the demand. Start light. Add five to 10 pounds and see how it affects your hold time. Adjust from there.
Isometric contrast sets
Pair an isometric hold with an explosive movement to maximize neural drive and power output.
- Wall Sit (30 seconds) immediately into Jump Squats (5 reps)
- Split Squat Hold (20 seconds per leg) immediately into Alternating Jump Lunges (10 total reps)
- Single-Leg Wall Sit (15 seconds per leg) immediately into Single-Leg Box Jumps (3 reps per leg)
The isometric hold primes your nervous system, pre-activating the muscle fibers you’re about to use explosively. The result is higher force production and better motor unit recruitment during the dynamic movement. Rest 2 to 3 minutes between contrast sets. This is advanced work. Don’t program this more than once a week.
Advanced isometric training isn’t about doing more exercises. It’s about manipulating angles, load, time, and intensity to create a training stimulus your body can’t ignore. These protocols build strength that transfers to every movement pattern you care about, and they do it without destroying your joints or requiring hours in the gym.
How Isometric Leg Work Fits Into Your Broader Training
Isometric leg exercises aren’t a standalone program. They’re a tool that enhances everything else you’re already doing.
If you’re focused on calisthenics, isometric holds build the static strength required for advanced movements like pistol squats, shrimp squats, and single-leg box pistols. You can’t control a full-range pistol squat if you can’t hold a single-leg wall sit for at least 15 seconds. The isometric strength comes first, then the dynamic movement becomes accessible.
If you’re training with kettlebells, isometric leg work strengthens the positions you move through during goblet squats, lunges, and single-leg deadlifts. A 45-second wall sit before a set of heavy goblet squats primes your quads and improves your ability to stay upright through the entire range of motion. A split squat hold before loaded lunges teaches your body to stabilize under tension, which reduces compensations and makes the working sets cleaner.
If you’re rucking regularly, isometric leg training builds the positional strength and muscular endurance that keeps your knees healthy and your legs fresh over long distances. Rucking is sustained, low-level tension over time. Isometric holds are maximum tension for shorter bursts. Training both creates a complete strength profile that handles everything from explosive sprints to multi-hour loaded carries.
If you’re doing bodyweight HIIT, isometric holds are the perfect active recovery or cool-down. After a high-intensity interval session, your nervous system is fried and your joints are fatigued. A deep squat hold or a light wall sit brings your heart rate down while maintaining tension in the muscles you just worked. You’re extending the training stimulus without adding joint stress or neurological fatigue.
Program isometric leg work two to four times per week depending on your goals and recovery capacity. Use it as a primer before strength work, a finisher after conditioning, or a standalone session on days when you want to train hard but need to manage fatigue. It fits anywhere because it requires no equipment, creates minimal soreness, and builds the kind of strength that makes everything else easier.
Mobility Considerations and Joint Health
Isometric leg training builds strength, but only if you have the mobility to get into the positions in the first place. You can’t hold a deep squat if your ankles don’t dorsiflex. You can’t hold a proper split squat if your hip flexors are locked up.
Ankle mobility is the first limiter most people hit.
If your heels come off the ground during a deep squat hold, you don’t have enough ankle dorsiflexion to access the position. Fix this with daily ankle mobility work. Spend two minutes in a deep squat hold with your hands on a wall or post for support. Rock forward and backward, pushing your knees over your toes to load the ankles. Do calf stretches against a wall, holding for 60 seconds per side. Over time, your ankles will adapt and your squat depth will improve.
Hip mobility determines how well you can hold positions with your torso upright.
If you fold forward during a wall sit or a horse stance, your hips are pulling you out of position. Work on hip flexor length with couch stretches and deep lunge holds. Improve hip internal rotation with 90/90 stretches and controlled hip circles. The better your hips move, the easier it is to maintain proper alignment during isometric holds.
Knee health improves with isometric training when done correctly.
Isometric holds at various knee angles strengthen the tendons around the patella and improve the stability of the joint itself. This is why isometric training is often used in physical therapy for knee rehab. But if you’re dealing with current knee pain, don’t push through it. Adjust the angle, reduce the hold time, or skip exercises that aggravate the joint. Isometric training should build resilience, not create new problems.
Spend five minutes before each isometric session warming up your joints. Spend five minutes after each session holding passive stretches or moving through full range of motion without load. This keeps your joints healthy, maintains the mobility you need to train effectively, and prevents the stiffness that can come from repeated static holds.
Mental Toughness and the Psychology of Static Holds
Isometric training is as much a mental challenge as a physical one. There’s no rhythm to fall into, no eccentric phase to give you a break, no end rep to push toward. Just you, the position, and the clock.
Most people quit isometric holds when their muscles start shaking. That shaking isn’t a sign of failure. It’s your nervous system working overtime to maintain tension as individual muscle fibers fatigue and others are recruited to pick up the slack. The shake means you’re in the zone where adaptation happens. If you stop the moment you start shaking, you’re stopping right before the work that actually builds strength.
Learn to sit in the discomfort. Your mind will tell you to stop at 20 seconds. Your legs will burn at 30. At 40 seconds, you’ll start negotiating with yourself, looking for reasons to quit early. Push through that. The mental skill you build by holding position when everything in you wants to stop transfers directly to every hard thing you’ll ever do. Rucking in the rain. Finishing a kettlebell workout when you’re already gassed. Holding a plank when your core is on fire.
Static holds teach you that discomfort is temporary and manageable. They teach you to breathe through tension instead of panicking. They teach you to stay present and focused when your body is screaming. That’s a skill set that extends far beyond leg training.
Use countdowns instead of watching the clock. If you’re holding for 45 seconds, count backward from 10 during the last 10 seconds. It gives your mind something to focus on other than the burn. Use breathing patterns. Inhale for three seconds, exhale for three seconds, repeat. The rhythm keeps you calm and gives you a focal point. Use mental cues. “Lock it in.” “Hold the line.” “Own the position.” Whatever works for you.
Isometric training builds physical strength, but the mental resilience you develop is just as valuable. That’s what separates people who train for years from people who quit after a few months. The ability to do hard things when they feel hard.
Progressions You Can Chase for Years
Isometric leg training doesn’t plateau if you’re willing to keep pushing the variables. Here are progressions that will challenge you for years, not weeks.
Wall Sit Progressions:
- Standard wall sit, 90-degree knee angle, 60 seconds
- Single-leg wall sit, 90-degree knee angle, 20 seconds per leg
- Wall sit with added load (kettlebell, weight vest, backpack), 45 seconds
- Deep wall sit, 70-degree knee angle, 40 seconds
- Single-leg deep wall sit, 70-degree knee angle, 15 seconds per leg
Split Squat Hold Progressions:
- Standard split squat hold, back knee hovering, 30 seconds per leg
- Front-foot elevated split squat hold, 4-inch platform, 30 seconds per leg
- Front-foot elevated split squat hold with added load, 30 seconds per leg
- Rear-foot elevated split squat hold (Bulgarian split squat position), 20 seconds per leg
- Rear-foot elevated split squat hold with added load, 20 seconds per leg
Deep Squat Hold Progressions:
- Assisted deep squat hold (hands on a post), 60 seconds
- Unsupported deep squat hold, 60 seconds
- Deep squat hold with arms overhead, 45 seconds
- Pistol squat bottom position hold (assisted), 15 seconds per leg
- Pistol squat bottom position hold (unassisted), 10 seconds per leg
Each progression adds difficulty through angle, load, or stability demand. You don’t need to rush through these. Spending three months building a rock-solid 60-second wall sit before moving to single-leg work is smart training, not wasted time. Master each level before adding complexity.
Chase these progressions with the same intensity you’d bring to adding weight to a barbell. Track your times, celebrate new PRs, and treat every second you add to a hold as a legitimate strength gain. Because that’s exactly what it is.
Troubleshooting Common Issues
Even with solid programming and good intentions, you’ll run into issues. Here’s how to fix the most common problems.
Issue: You can’t hold a wall sit for more than 15 seconds without your legs giving out.
You’re either setting your position too deep or you haven’t built the baseline strength yet. Start with a higher wall sit position (knees at 110 to 120 degrees instead of 90). Hold that for 20 to 30 seconds, build strength there, then gradually lower your hips over weeks. You can also reduce the duration and increase the set count. Five sets of 12 seconds with short rest is better than one failed 15-second attempt.
Issue: Your knees hurt during or after isometric holds.
Check your knee tracking. If your knees are collapsing inward during a wall sit, split squat hold, or horse stance, you’re loading the joint in a way it’s not designed to handle. Push your knees out slightly, keep them aligned over your toes, and engage your glutes to maintain that alignment. If pain persists, adjust the depth. Work at a shallower angle where you can maintain position without pain, then gradually increase range as your strength improves.
Issue: One leg gives out significantly faster than the other during unilateral holds.
You’ve found an imbalance, and that’s valuable information. Don’t ignore it. Program extra volume on the weaker side. If your left leg can only hold a single-leg wall sit for 10 seconds while your right leg holds for 18, do an extra set or two on the left. Over time, the gap will close. This is exactly why unilateral work matters.
Issue: You’re getting bored or losing motivation with isometric training.
Isometric work isn’t flashy, and it’s easy to lose interest when you’re just holding still. Combat this by tracking your numbers obsessively. Write down every hold time, every session, every personal record. Compete with yourself. Set specific goals: “I want to hold a wall sit for 90 seconds by the end of this month.” Use a timer you can see, and push to beat your previous best every session. Gamify the process, and boredom disappears.
Issue: You’re not seeing strength transfer to other movements.
You might be training only one angle or position. If you’re only doing 90-degree wall sits, you’re only building strength at 90 degrees. Add variety. Train different knee angles, different stances, different unilateral positions. The more positions you own isometrically, the more that strength transfers to dynamic movements. Also, make sure you’re actually training the movements you want to improve. Isometric leg work supports pistol squats, but it doesn’t replace practicing pistol squats.
Fix the issue, adjust your training, and keep moving forward. Every problem has a solution if you’re willing to troubleshoot honestly.
Pairing Isometrics With Other Training Modalities
Isometric leg work doesn’t replace your other training. It enhances it. Here’s how to integrate it intelligently with the training styles most relevant to this audience.
Isometrics plus calisthenics
Use isometric holds as skill-building work for advanced calisthenics movements. Before practicing pistol squats, hold a single-leg wall sit for 15 seconds per leg. Before working shrimp squats, hold a rear-foot elevated split squat position for 20 seconds per leg. The isometric hold primes the exact muscles and positions you’re about to use dynamically, improving motor control and reducing compensation patterns.
Isometrics plus kettlebells
Program isometric holds as a primer before kettlebell leg work. A 30-second wall sit before goblet squats activates your quads and improves your ability to stay upright through the squat. A split squat hold before kettlebell lunges teaches your body to stabilize in the lunge position, making the loaded movement cleaner and safer. You can also use isometric holds as a finisher after kettlebell training to add volume without adding joint stress.
Isometrics plus rucking
Isometric leg training builds the muscular endurance and positional strength that keeps your legs fresh during long rucks. Program a short isometric session the day before a long ruck to activate your muscles without creating fatigue. Or use isometric holds as a recovery tool the day after a hard ruck. A light wall sit or deep squat hold flushes metabolic waste from your legs and maintains the training stimulus without adding stress.
Isometrics plus gymnastics
Gymnasts use isometric holds constantly because they build the static strength required to hold positions on rings, bars, and floor. If you’re working toward L-sits, front levers, or handstand variations, isometric leg work teaches your body to create and maintain full-body tension. The skills you develop holding a wall sit under maximum tension transfer directly to holding a tuck L-sit or a straddle position.
Isometrics plus mobility work
Use isometric holds to build strength at end-range positions. After a hip mobility session, hold a deep squat for 60 seconds to lock in the new range under load. After working ankle mobility, hold a wall sit with your knees pushed forward to strengthen the position you just opened up. This is how you turn temporary mobility gains into permanent improvements.
Don’t treat isometric training as a separate, disconnected piece of your program. Weave it into what you’re already doing. Use it to support your primary goals, expose weaknesses, and build the positional strength that makes every other movement better.
Sample Weekly Training Integration
Here’s what a week of training might look like when you integrate isometric leg work intelligently with other modalities.
Monday: Kettlebell Strength
- Wall sit, 3 sets of 30 seconds (primer before squats)
- Goblet squats, 4 sets of 8 reps
- Kettlebell swings, 5 sets of 15 reps
- Single-leg Romanian deadlifts, 3 sets of 6 reps per leg
- Deep squat hold, 2 sets of 45 seconds (cool-down)
Tuesday: Isometric Focused Session
- Single-leg wall sit, 4 sets of 12 seconds per leg
- Front-foot elevated split squat hold, 4 sets of 20 seconds per leg
- Horse stance, 3 sets of 35 seconds
- Deep squat hold, 2 sets of 60 seconds
Wednesday: Ruck
- 4-mile ruck with 30-pound load
- Post-ruck: Deep squat hold, 2 sets of 40 seconds (recovery and mobility)
Thursday: Bodyweight HIIT
- Jump squats, burpees, mountain climbers, alternating intervals
- Finisher: Wall sit to failure, rest 60 seconds, repeat for 3 total sets
Friday: Calisthenics Skill Work
- Single-leg wall sit, 3 sets of 10 seconds per leg (primer before pistols)
- Pistol squat practice, 5 sets of 3 reps per leg
- Pull-up variations, 4 sets of max reps
- L-sit progressions, 4 sets of max hold
- Deep squat hold, 2 sets of 60 seconds (cool-down)
Saturday: Long Ruck or Active Recovery
- 6-mile ruck with light load OR mobility and stretching session
Sunday: Isometric and Mobility
- Wall sit, 3 sets of 45 seconds
- Split squat hold, 3 sets of 25 seconds per leg
- Calf raise hold, 3 sets of 20 seconds per leg
- Hip and ankle mobility work, 15 minutes
This structure gives you two dedicated isometric sessions per week, plus strategic use of isometric holds as primers, finishers, and recovery tools throughout the week. Adjust volume and intensity based on your recovery capacity, your primary goals, and how your body responds.
The goal isn’t to do more. It’s to do what you’re already doing better, with stronger positions, better control, and fewer compensations.
Isometric leg training is simple. Hold a position. Fight to maintain it. Add time as you adapt. But simple doesn’t mean easy, and it definitely doesn’t mean ineffective. The strength you build through static holds is the foundation for every dynamic movement you care about. It’s the missing piece most people skip, and it’s the reason their progress stalls even when they’re training hard.
Your legs are designed to produce and absorb force through a full range of motion, but they can only do that effectively if they can first own every position within that range. Isometric work teaches your body to own those positions. It builds the tendons, activates the stabilizers, trains the nervous system, and creates the kind of strength that doesn’t just show up in the gym. It shows up when you’re carrying a ruck up a hill, holding a deep squat to pick something off the ground, or stabilizing on one leg when the trail gets technical. That’s durable fitness. That’s strength that lasts.


ABOUT THE AUTHOR
Carlos Grider is a former U.S. Marine, CrossFit Level 1 trainer, certified personal trainer, and the creator of Forge the Flow. After nearly a decade supporting combat operations and special operations in austere environments — and another decade traveling across 65+ countries as a nomad and adventure athlete — Carlos distilled everything he learned about staying strong, capable, and resilient without a gym into the Forge the Flow training system. He has trekked solo to Everest Base Camp, surfed Bali through the pandemic, trained Muay Thai in Thailand, and run self-guided marathons across four continents — all maintained on minimalist training built for real life. He writes about the fitness methods that actually travel.
Click here to learn more about Carlos's story.