This short daily flow hits all six planes of hip motion in under ten minutes — with step-by-step instructions for every drill so you can run it anywhere, no video required.
Your hips are supposed to move in six directions. Most people are stuck in two.
Flexion and extension — forward and back — are the only planes most people ever use. The rest of the directions your hip joint was designed for: rotation, abduction, adduction, all of it, gets locked down over time from sitting, from training only in straight lines, and from never doing any dedicated work to maintain them. The result is stiff hips that limit your stride length, cap your squat depth, dump load into your lower back, and make you move like you’re held together with zip ties.
The flow in this article fixes that. It’s seven exercises, under ten minutes, and it covers every direction your hips need to move — not just the comfortable ones. It was built for athletes, but it works for anyone who sits more than they’d like to admit. And unlike a random stretch here and a foam roll there, it’s structured as an actual flow: one movement leads into the next, the whole thing builds, and by the end your hips feel like a completely different joint.
If you want to understand the bigger picture — why hip mobility matters, how it connects to your lower back and knees, and how to build a complete program around it — check out the complete guide to hip mobility exercises and the hip and knee mobility training guide we’ve already published. This article is designed to stand alone, but those two are the system this flow fits into.
Let’s get into it.

Table of Contents
Before You Start: A Quick Word on Injuries
If you’re dealing with sharp pain inside the hip joint, clicking or locking that feels mechanical, pain that shoots down your leg, or any symptom that feels like something is actually wrong — not just stiff or tight — get it assessed by a physician or physio before you start pushing into new ranges. This flow is built for mobility restriction and stiffness from sitting, training imbalances, and general neglect. It’s not a substitute for medical evaluation when something is actually injured.
For most people dealing with tight, restricted, or underused hips, you’re in the right place.
How to Use This Flow
This is an active mobility flow, not a passive stretching session. The goal isn’t just to achieve end range — it’s to build neuromuscular control through range. That’s what turns temporary flexibility into permanent, usable mobility.
Use it as a morning routine. Ten minutes after you get up is the best possible time to run this. Your hips have been compressed and static for hours. Moving through every direction of motion first thing in the morning restores synovial fluid circulation, reduces stiffness, and sets your nervous system up for the day.
Use it as a pre-workout primer. Before any lower-body training session, run through this at a dynamic pace — no long holds, keep moving. It activates the hip musculature, clears restrictions, and primes the joint for loaded work.
Use it as a standalone session. If you’re just doing mobility work, slow each movement down, pause at end range for two to three seconds, and add brief isometric holds at the top of each rep. That’s where the real adaptation happens.
What you need: A mat. A yoga block for exercise five (a thick book or folded blanket works too). That’s it.
Total time: Eight to twelve minutes.
Frequency: Daily is ideal. Three to four times per week minimum to see progressive change.
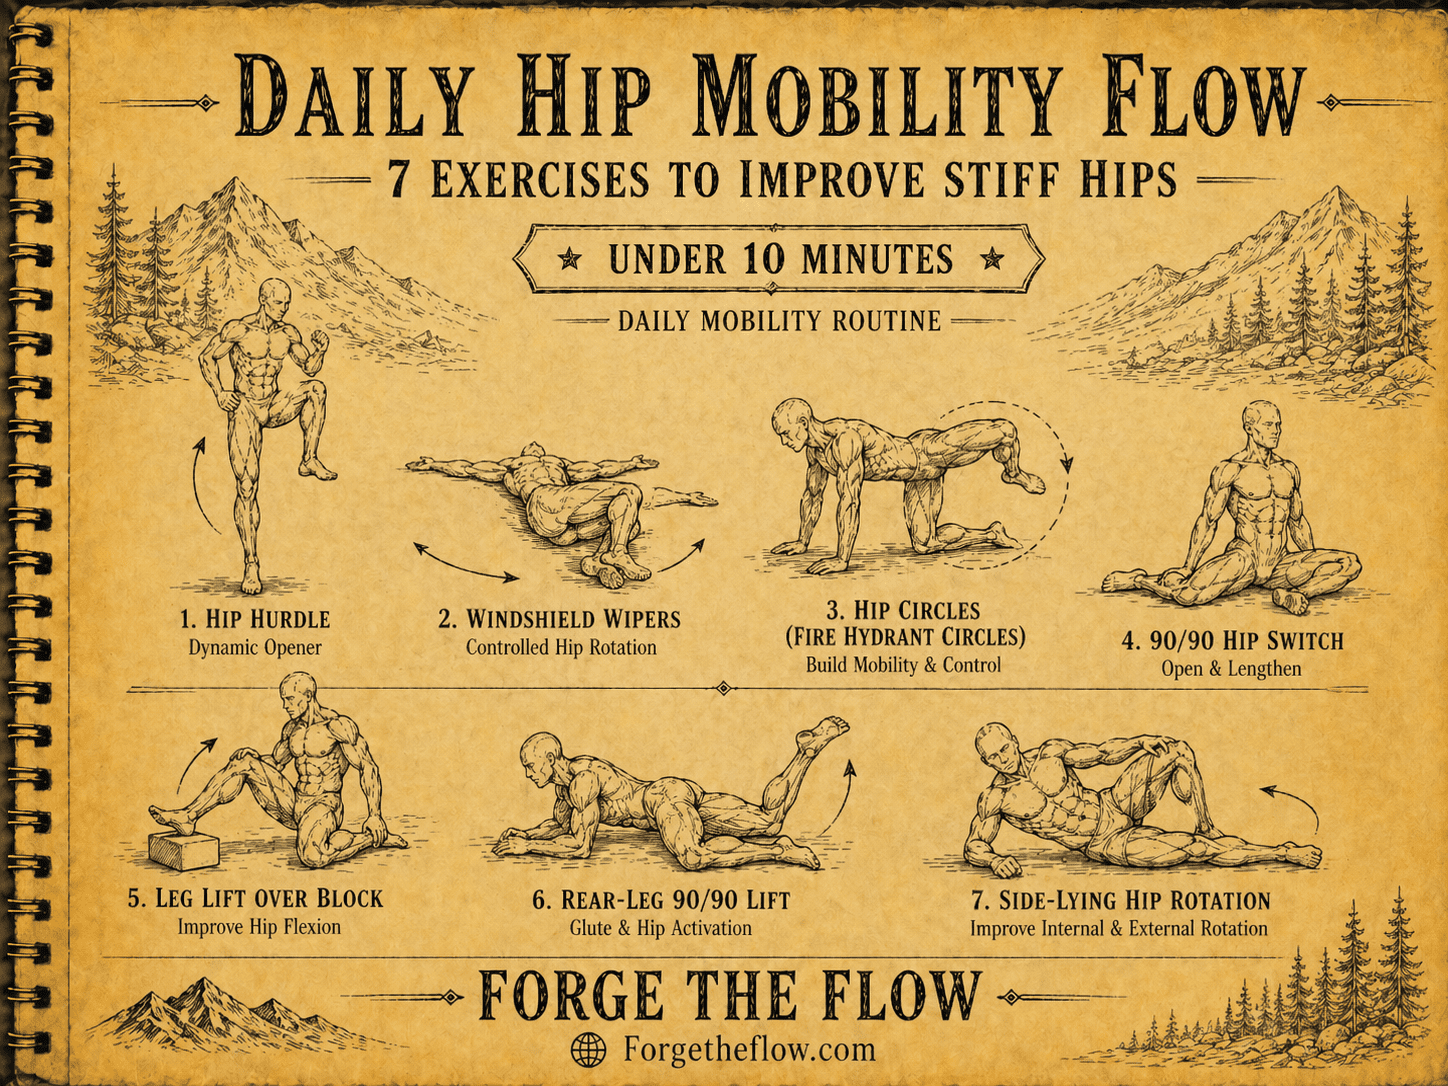
The Flow at a Glance
Exercise | Reps | Primary Range |
|---|---|---|
Hip Hurdles | 10 each direction, each leg | Full circumduction (all planes) |
Windshield Wipers | 10 reps (5 per side) | Internal + external rotation |
Hip Circles (Quadruped) | 10 each direction, each leg | Full circumduction (isolated) |
90/90 Hip Extensions | 10 each side | Hip flexor release + posterior tilt |
Leg Lifts Over Yoga Block | 10 each leg | Hip flexion + abduction inner range |
90/90 Hip Lifts (Rear Leg) | 10 each side | Hip extension + internal rotation |
Side Hip Rotations | 10 each side | Hip external rotation |
Exercise 1: Hip Hurdles — 10 Reps Each Direction, Each Leg
What it is
A standing hip circumduction drill where one leg traces a large arc in the air — up, out, back, and around — in both directions. Think of stepping over an imaginary hurdle at hip height, forward and backward.
How to do it
Stand tall with feet hip-width apart. Rest your hands on a wall or the back of a chair for balance if you need it.
Lift one knee up toward your chest, rotate the hip outward (external rotation), and sweep the leg wide and back — as if you’re stepping over a hurdle. Let the foot come down behind you, then reverse: lift the leg back and behind you, rotate the hip inward (internal rotation), sweep the knee forward, and return to the start position.
That’s one rep. Do ten in each direction on each leg.
Coaching cues
Keep the standing hip stable and level — don’t let your pelvis rock from side to side to create the range. The range has to come from your hip, not your lower back or trunk. Drive the knee as high as you genuinely can without compensating. Move slowly and deliberately. This isn’t a swing. It’s a controlled rotation.
Why it works
Hip hurdles are one of the most complete hip mobility drills you can do from a standing position. In one movement, you’re loading hip flexion, external rotation, extension, and internal rotation sequentially — essentially a full controlled articular rotation (CAR) in a functional position. They directly transfer to running, sprinting, hurdling, kicking, and any movement that requires you to cycle your legs through a large arc. If your hips feel like they’re being dragged through mud during the rotation, that’s the drill telling you exactly where your restrictions are.
What’s being trained: All six directions of hip motion; hip capsule mobility; dynamic neuromuscular coordination through full circumduction range.
Exercise 2: Windshield Wipers — 10 Reps
What it is
A floor-based drill performed lying on your back with knees bent. Both legs drop together from side to side — like windshield wipers — training hip internal and external rotation while the pelvis stays grounded.
How to do it
Lie on your back with both knees bent at 90 degrees and feet flat on the floor, hip-width apart. Arms out to the sides for stability. Shoulders flat on the ground throughout.
Slowly drop both knees to the right, lowering them toward the floor as far as your hip mobility allows without letting your left hip peel off the ground. Pause at the end of your range. Return to center, then drop both knees to the left.
That’s one rep. Do ten total — five per side.
Coaching cues
Your hips determine the range here, not your lower back. Don’t create more rotation by twisting your spine. Resist the movement on the way down — don’t just let gravity drop your legs. Move at a controlled two to three second tempo in each direction. To progress, pause three to five seconds at end range, or lift your feet off the floor so your knees and hips start at 90 degrees in the air — that version is significantly more demanding.
Why it works
Windshield wipers train hip internal rotation on the side the knees are dropping toward, and hip external rotation on the opposite side — simultaneously, in one drill. Hip internal rotation is the single most neglected direction of hip mobility, and its restriction is directly linked to anterior knee pain, IT band problems, and running inefficiency. Most people feel how tight they are the moment they try this for the first time. That’s the information you need.
What’s being trained: Hip internal and external rotation bilaterally; hip capsule mobility; controlled rotational range without lumbar compensation.
Exercise 3: Hip Circles (Quadruped) — 10 Reps Each Direction, Each Leg
What it is
A hands-and-knees hip circumduction drill — often called the fire hydrant circle — where one knee traces the largest possible circle in the air in both directions. This is the isolated version of the hip hurdle from Exercise 1.
How to do it
Start in a quadruped position: hands under shoulders, knees under hips, wrists stacked, spine neutral. Don’t arch or round your lower back.
Keeping the knee bent at 90 degrees, lift one knee out to the side (abduction), then sweep it forward and up (flexion), then back and behind you (extension), and return to the start — tracing a full circle. Make the circle as large as your current mobility allows.
Do ten circles in one direction, then reverse. Complete both directions on one leg before switching.
Coaching cues
The most common error is rotating the pelvis to fake range. Keep the opposite hip square to the ground. The movement has to come from the hip joint itself — your lower back stays completely still. Core lightly braced. Breathe. If you notice the circle has a flat spot somewhere — a direction where it gets choppy, small, or you have to compensate — that’s where your restriction lives.
Why it works
The quadruped position does something the standing version can’t: it removes the lumbar spine’s ability to cheat. When your pelvis is stable against gravity, the hip joint has to do the actual work. That makes this drill extraordinarily effective at identifying and training true hip range — especially the extension and internal rotation portions of the arc that most people lose access to first. It also directly transfers to squat depth, deadlift lockout mechanics, and the hip extension needed for sprint push-off.
What’s being trained: Full hip circumduction in isolation; glute medius, glute minimus, deep hip rotators (the “deep six”), hip capsule in all directions.
Exercise 4: 90/90 Hip Extensions — 10 Reps Each Side
What it is
From the 90/90 position — both legs bent at 90 degrees, one in front and one behind — you hinge your torso forward over your front shin, driving the rear hip into extension and releasing the hip flexor on the rear leg.
How to do it
Sit on the floor in a 90/90 position: front knee at 90 degrees pointing forward, shin roughly parallel to the front of your mat; rear knee at 90 degrees pointing back, shin behind you. Both sitting bones on the floor if possible. Sit upright with a neutral spine.
From here, hinge your torso forward over your front shin — keeping your chest tall, not rounding your back — and lower your chest toward the floor as far as your range allows. Think of it as a hip hinge over your front leg, not a spinal curl forward. At the bottom of each rep, you’ll feel a stretch in the front of the rear hip and hip flexor.
Return to upright. That’s one rep. Do ten per side.
Coaching cues
This is a hip hinge, not a forward fold. Your lower back should stay neutral — if you’re rounding dramatically to get lower, you’re just curling your spine, not hinging at the hip. Keep the front foot dorsiflexed (toes pulled up) to protect the knee. Add a two to three second hold at the bottom of each rep when you’re ready to progress. If your rear sitting bone comes completely off the floor, sit on a folded blanket or yoga block to elevate your hips slightly — this makes it easier to maintain the position with good alignment.
Why it works
The 90/90 position is one of the most efficient hip mobility positions that exists. It simultaneously loads external rotation on the front hip and internal rotation on the rear hip — so you’re training both directions at once. The forward hinge adds a dynamic hip flexor stretch to the rear leg and builds the posterior pelvic tilt awareness that’s critical for correcting anterior pelvic tilt. If you sit at a desk all day, the hip flexor stretch component of this exercise is one of the most impactful things you can do for your lower back and hip health.
What’s being trained: Rear hip flexor length (iliopsoas, rectus femoris); bilateral hip rotation; posterior pelvic tilt awareness; hip hinge motor control.
Exercise 5: Leg Lifts Over a Yoga Block — 10 Reps Each Leg
What it is
A standing drill where one leg lifts and sweeps laterally over a yoga block placed on the ground beside your foot, training hip flexion and abduction at inner range — the top of the movement where most people are weakest.
How to do it
Place a yoga block on its lowest or medium height beside one foot. Stand with light fingertip contact on a wall for balance.
Keeping the leg straight (or with a soft knee), lift the inside leg and sweep it up and over the block, clearing it at the top of the arc, and place the foot down on the other side. Reverse the motion — lift the leg back over the block and return to start.
That’s one rep. Do ten per leg.
Coaching cues
The lift has to come from your hip — not from hiking your pelvis up toward your ribs or leaning heavily to the opposite side. If you’re tilting your whole trunk to get over the block, the block is too tall or your hip flexor isn’t firing yet. Start low and earn height. Move deliberately. Progress by using a taller block, pausing at the top of the arc for a two-second hold, or removing the wall contact entirely to add a balance challenge.
Why it works
Most hip flexor training happens in the mid-range of motion — the easy part. This drill specifically targets the inner range of hip flexion: the top of the arc, where the hip flexors are at their shortest and where strength is usually lowest. Building strength at this end range is the difference between passive flexibility and functional mobility. It also directly trains hip abduction in a dynamic, loaded position, which most conventional training completely misses.
What’s being trained: Hip flexors at inner range (iliopsoas, rectus femoris); hip abductors (glute medius, TFL); hip capsule superior and anterior; proprioceptive balance in single-leg stance.
Exercise 6: 90/90 Hip Lifts (Rear Leg Lifts) — 10 Reps Each Side
What it is
From the 90/90 position, the rear leg lifts off the ground into hip extension — building active strength and end-range control in the hip extension and internal rotation position simultaneously.
How to do it
Return to the 90/90 position from Exercise 4. This time, instead of hinging forward, you’re staying upright and lifting the rear leg.
Keeping the rear knee bent at 90 degrees, squeeze the glute of the rear leg and lift the rear knee off the floor by driving the thigh backward. Your rear shin lifts into the air. Hold briefly at the top — one to two seconds — then lower back to the floor with control.
Do ten reps per side before switching.
Coaching cues
Initiate from the glute, not from hiking your pelvis or arching your lower back. Keep your torso upright and your front hip grounded — don’t let your body tip forward to create fake range. The range of motion will feel small at first. That’s completely normal and it’s the point — you’re building strength at end range, not just moving through it. Progress by adding a three to five second isometric hold at the top of each rep. That hold turns this into an end-range isometric, which is the most powerful tool for converting passive flexibility into active, owned range.
Why it works
Hip extension in the internal rotation position — which is what the rear leg is in during the 90/90 — is one of the most underdeveloped and underused ranges in the human body. It’s critical for the push-off phase of running, for full glute activation in squatting and hinging patterns, and for correcting the shortened, anteriorly tilted hip position that develops from years of sitting. Most glute work trains extension in external rotation. This drill fills the gap.
What’s being trained: Gluteus maximus (hip extension); posterior hip capsule; hamstrings proximally; active end-range control in internal rotation; anterior pelvic tilt correction.
Exercise 7: Side Hip Rotations — 10 Reps Each Side
What it is
A standing figure-four drill where the hip is actively opened into external rotation — rotating the knee outward and downward — to train hip external rotation in a loaded, single-leg position.
How to do it
Stand facing a wall with your hands resting on it lightly for balance. Shift your weight to one leg with a slight bend in the knee.
Lift the opposite foot and cross that ankle just above the standing knee — a figure-four position. From here, actively rotate the raised knee outward and downward, as if you’re trying to point your knee toward the floor. Use your hip rotators to create the movement. Pause at the end of your range, then return the knee upward.
That’s one rep. Do ten per side.
Coaching cues
Don’t push your knee down with your hand — use your hip rotators to drive the movement actively. That’s the whole point. Keep your standing leg slightly bent and your foot straight — don’t let the standing foot collapse inward or roll to the outside. Keep your pelvis level throughout and avoid lateral trunk tilt. Progress by holding the bottom position for three to five seconds, or performing the drill without wall support to add a single-leg balance and proprioception challenge.
Why it works
External rotation is the most commonly restricted direction of hip motion in people who sit, and it’s one of the most important for athletic performance. Restricted external rotation causes knees to collapse inward during squats, lunges, and landing — which loads the knee joint incorrectly and leads to pain over time. Training it in this single-leg, loaded position directly transfers to lateral movements, athletic pivoting, and the deep squat bottom position. It also strengthens the deep six external rotators — piriformis, obturators, gemelli, and quadratus femoris — which are almost never specifically targeted in conventional training.
What’s being trained: Piriformis; obturator internus and externus; gemellus superior and inferior; quadratus femoris; glute medius; posterior hip capsule.
How Often Should You Do This?
Daily use is ideal. Your hips respond well to frequent, low-load stimulus — and this flow is low enough intensity that it’s restorative rather than taxing. You can run it every day without accumulating fatigue.
That said, three to four times per week is the minimum effective frequency if you want to see progressive, lasting change in your range of motion. Research consistently shows that flexibility and mobility adaptations require repeated exposure over four to six weeks of consistent practice before they begin to stick neurologically. You’ll feel better after session one. You’ll move differently after month one.
As a morning routine: Run the full flow at a controlled pace with brief pauses at end range. Ten to twelve minutes.
As a pre-workout primer: Move dynamically through each exercise without holding. Keep the tempo up, skip the pauses. Five to eight minutes. This version wakes up the hip musculature and primes the joint for loaded work without fatiguing it.
As a standalone mobility session: Slow everything down. Add three to five second holds at end range on every rep. You can also add a light isometric contraction at the top of exercises six and seven — try to push your leg further into range without actually moving — then relax and sink deeper. That’s the PAILs and RAILs principle, and it’s the most effective method for converting passive range into active, owned range.
Signs This Routine Is Working
After two to four weeks of consistent practice, here’s what you should start to notice:
- Your knees drop closer to the floor in windshield wipers without your hips lifting off the ground
- The circle in hip circles gets bigger and smoother, with fewer choppy or stuck spots
- The rear leg lifts higher in the 90/90 lifts with less pelvic compensation
- Your squat depth improves without your heels coming up
- Your lower back feels less compressed and stiff in the morning
- Single-leg exercises in your training feel more stable
If you’ve been at it for four weeks and not seeing any of these changes, the most likely culprit is that you need soft tissue release work before you stretch and move. Tight, knotted tissue doesn’t stretch well — it just pulls on the restriction. Adding five to ten minutes of hip flexor release, adductor foam rolling, and glute smash work before this flow will dramatically accelerate your progress. The complete system for that is laid out in the hip mobility exercises guide.
The Bigger Picture
This flow is one piece of a complete hip mobility system. The seven exercises here cover active range and end-range loading — the third phase of the three-phase approach we use at Forge the Flow. The full system also includes soft tissue release (foam rolling, lacrosse ball work, trigger point release) and passive stretching (couch stretch, pigeon, 90/90 holds) before you ever get to this flow. Doing all three phases in sequence — release, stretch, strengthen — is what creates lasting structural change instead of temporary relief.
But starting here? That’s completely valid. Ten minutes of structured, intentional hip work that covers all six directions of motion is exponentially more valuable than another session of randomly stretching whatever feels tight.
Do the flow. Do it consistently. And watch what happens to your hips — and everything connected to them — over the next four weeks.
Want to go deeper? Read the complete hip mobility training guide for the full three-phase system, or check out the hip and knee mobility article to understand how your hips and knees work together as one system.


ABOUT THE AUTHOR
Carlos Grider is a former U.S. Marine, CrossFit Level 1 trainer, certified personal trainer, and the creator of Forge the Flow. After nearly a decade supporting combat operations and special operations in austere environments — and another decade traveling across 65+ countries as a nomad and adventure athlete — Carlos distilled everything he learned about staying strong, capable, and resilient without a gym into the Forge the Flow training system. He has trekked solo to Everest Base Camp, surfed Bali through the pandemic, trained Muay Thai in Thailand, and run self-guided marathons across four continents — all maintained on minimalist training built for real life. He writes about the fitness methods that actually travel.
Click here to learn more about Carlos's story.